Setup Environment
Introduction
ASP.NET MVC 4 is a framework for building scalable, standards-based web applications using well-established design patterns and the power of ASP.NET and the .NET Framework.You can use ASP.NET MVC 4 with Visual Studio 2010 and 2012. As of now previous visual studio versions doesn't support ASP.NET MVC 4.
This article will guide you through the step by step installation of ASP.NET MVC 4.
Background
Visual Studio 2012 is already packaged with ASP.NET MVC 4. Visual Studio 2010 was packaged with MVC 2 as MVC 3 and MVC 4 was released after Visual Studio 2010 release.Visual Studio 2012 Express (Free) version also comes with ASP.NET MVC 4.
To Install ASP.NET MVC 4 to Visual Studio 2010, you must have SP1 installed for VS 2010, If you don't have Service Pack 1 installed for Visual Studio then please click here. This service pack is also available in .ISO format.
There are multiple options available for ASP.NET MVC 4 installation. You may choose the one from the below option.
How to Install
There are three different options for installing ASP.NET MVC 4 for Visual Studio 2010.- ASP.NET MVC 4 Web Platform Installer for Visual Studio 2010 SP1.
- Download the standalone ASP.NET MVC 4 installer executable.
- Via ASP.NET MVC 4 NuGet Packages
Using Web Platform Installer
Web Platform Installer makes it easy for you to download, install. ASP.NET MVC 4 also can be installed through the Web PI.To Install ASP.NET MVC 4 using Web Platform Installer, please click hereWhen you click on the above link, new tab will get opened with the below page,
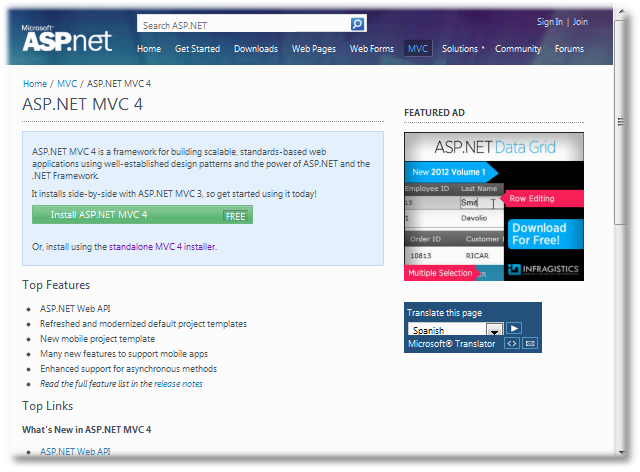
Click on the "Install ASP.NET MVC 4" button.
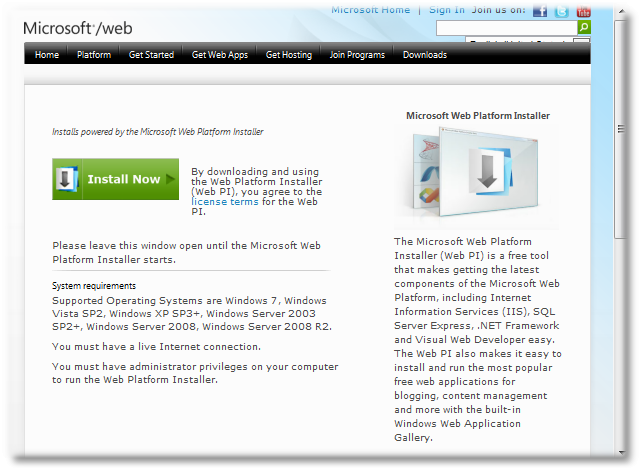
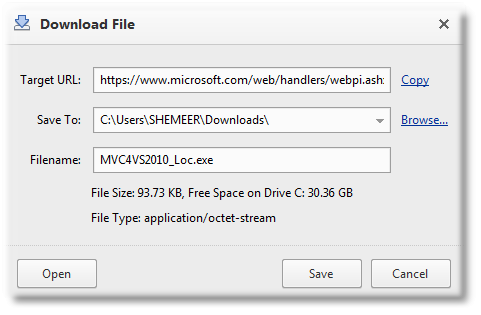
Click on "Install Now" button. That will popup a save dialog as per your web browser setting.

Once
the file downloading is completed, then open the file from the
downloaded location like above, Once you execute the downloaded file
that will prompt a UAC or similar window like below

If you click "Yes" then it will show the below screen

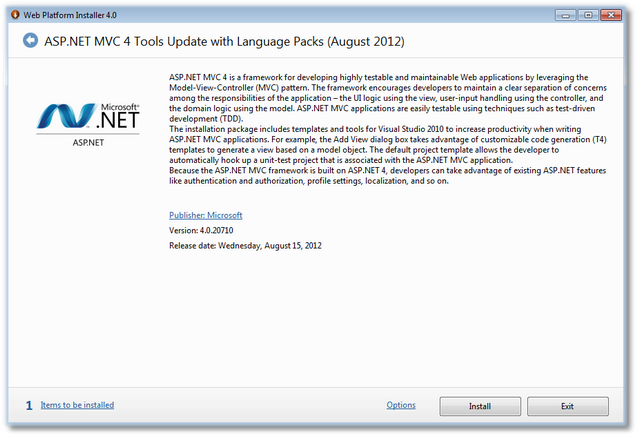
The
below files will be downloaded (approx 33 MB) from internet. (If you
want to use this setup later also then you can choose standalone
installer)

To
continue with installation click on "Install" button, and Accept the
Licence terms by clicking "Accept" button. Once you "Accepted" then it
will download and install ASP.NET MVC 4.

Using Standalone installer
If you want to have a copy of the setup file or if you have multiple machines that needs to be setup with MVC 4 then standalone installer is the right option.To install ASP.NET MVC 4 with standalone installer, please click here
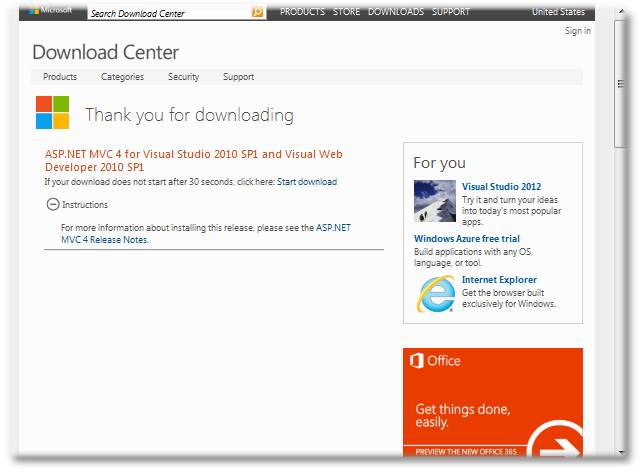
If you click on the above link then you will be redirected to the below page,
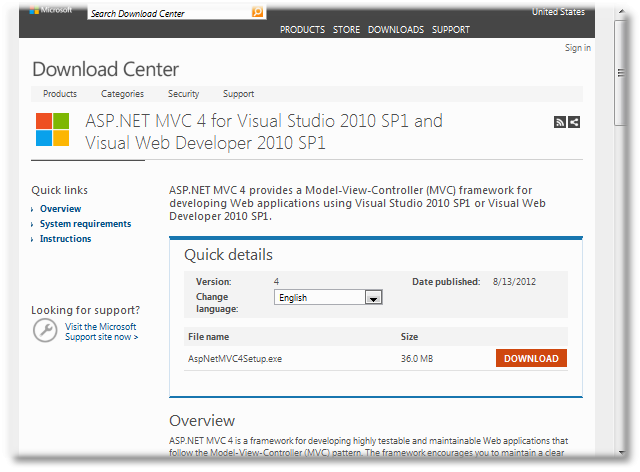
Click Download and Save the file to a particular location.

Once the downloading completed then go to the saved location and then execute the file,
It will show the security message / UAC as per your settings, Click on the "Yes" / "Run" button,

Once you have clicked on the above button then you will get the "Installation" UI.

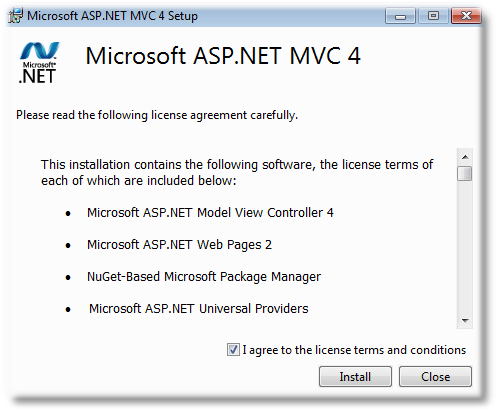
By clicking the above "Install" button, ASP.NET MVC 4 will be installed for Visual Studio 2010 SP 1.
Just Open Visual Studio 2010 , ASP.NET MVC 4 will be listed in the available templates,

Via Nuget Packages
"NuGet is a Visual Studio extension that makes it easy to add, remove, and update libraries and tools in Visual Studio projects that use the .NET Framework. When you add a library or tool, NuGet copies files to your solution and automatically makes whatever changes are needed in your project, such as adding references and changing your app.config or web.config file. When you remove a library, NuGet removes files and reverses whatever changes it made in your project so that no clutter is left." from NuGet.org
To know more about ASP.NET MVC 4 NuGet package, please click here.
If you have already NuGet package manager installed then you will get the below menu option.

You will get the below screen after clicking on the package manager console,

Then type the below command, (make sure that you have already opened a valid project)
Install-Package AspNetMvc

Pressing "Enter" key will execute the command,

Once it's done you can see that the references are added to the project.
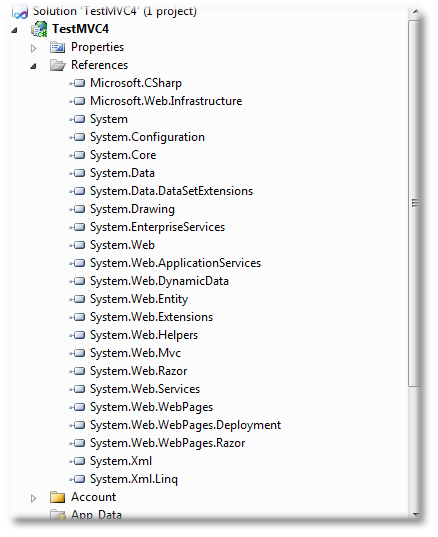
The below given packages folder is added to the project location,

the packages folder contains below folders,

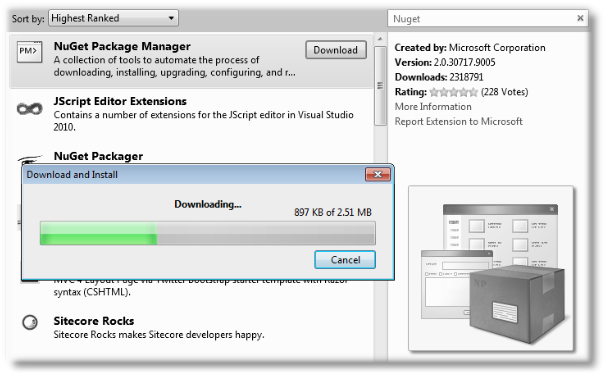
If you don't have NuGet Package manager installed then go to Extension manager and search for NuGet
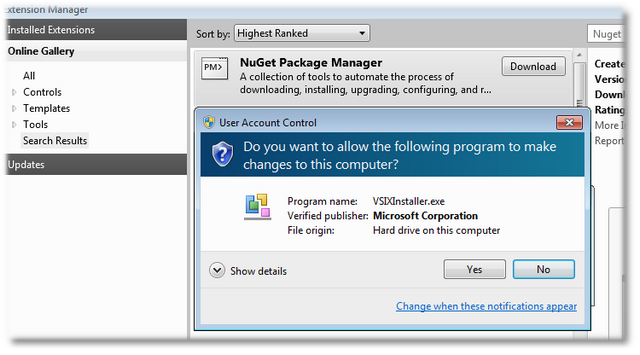
Then Click "Download"

Troubleshooting
- ASP.NET MVC 4 for Visual Studio 2010 Installation Errors- incompatible with .NET 4.5 or earlier, upgrade to .NET Framework 4.5 latest version
- Visual Studio 2010 "Unknown Error" after uninstalling .NET Framework 4.5 (any version)
Table Of Contents
Introduction
ASP.NET MVC 4 is a framework for building scalable, standards-based web applicationsusing well-established design patterns and the power of ASP.NET and the .NET Framework.In this article I will give an introduction to ASP.NET MVC 4 from a beginner’s perspective.This article is meant for all kind of beginner users who wanted to get started with ASP.NET MVC 4. I have included a small comparison between ASP.NET MVC and ASP.NET Web forms for those who have already explored ASP.NET Web forms
Currently ASP>NET MVC 4 is supported in Visual Studio 2010 and Visual Studio 2012, previous versions of Visual Studio does not support ASP.NET MVC 4 as of now. If you don’t have ASP.NET MVC 4 in your box then install MVC 4 for Visual Studio 2010 or else use Visual Studio 2012 to get started with this article, You may refer Setup Environment article for more installation details/procedures.
What is ASP.NET MVC?
ASP.NET supports three different development models named Web Pages, MVC and Web Forms.
ASP.NET MVC is a web application development framework built on top of Microsoft’s .NET Framework. ASP.NET Web Form was a replacement for Microsoft’s Active Server Pages (ASP) but ASP.NET MVC is not a replacement for ASP.NET Web Forms and it’s just an alternate way of making an ASP.NET website.
ASP.NET MVC is open source!- In March 2012, Scott Guthrie announced on his blog that Microsoft had released part of their web stack (including ASP.NET MVC, Razor and Web API) under an open source license (Apache License 2.0).
Download from Codeplex.com
Why MVC?
ASP.NET MVC helps to reduce the complexity of the web application by dividing an application into three layers, Model, View and Controller. This separation (loose coupling) helps in some long term benefits like isolation of components while development and also this separation provides better support for test-driven development (TDD). ASP.NET MVC web site are good in performance and also easy to maintain.MVC Release History
The Current Version of ASP.NET MVC is 4 and it was released on 15th Aug 2012. ASP.NET MVC 4 is packaged with Visual Studio 2012 and MVC 4 can be installed for Visual Studio 2010. Below I have mentioned the release history of ASP.NET MVC.| Date | Version |
|---|---|
| 10 Dec 07 | ASP.NET MVC CTP |
| 13 Mar 09 | ASP.NET MVC 1.0 |
| 16 Dec 09 | ASP.NET MVC 2 RC |
| 04 Feb 10 | ASP.NET MVC 2 RC 2 |
| 10 Mar 10 | ASP.NET MVC 2 |
| 06 Oct 10 | ASP.NET MVC 3 Beta |
| 09 Nov 10 | ASP.NET MVC 3 RC |
| 10 Dec 10 | ASP.NET MVC 3 RC 2 |
| 13 Jan 11 | ASP.NET MVC 3 |
| 20 Sep 11 | ASP.NET MVC 4 Developer Preview |
| 15 Feb 12 | ASP.NET MVC 4 Beta |
| 31 May 12 | ASP.NET MVC 4 RC |
| 15 Aug 12 | ASP.NET MVC 4 |
MVC Architecture
The Model-View-Controller (MVC) pattern is an architectural design
principle that separates the application components of a Web
application into three layers. This separation gives you more control
over the individual parts of the application, which lets you more
easily develop, modify, and test them.
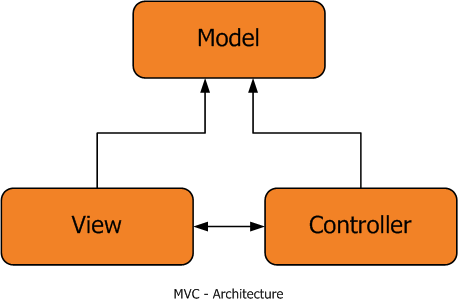
The Model
Model contains and exposes the properties and application logic In a better way we can say that The model represents core business logic and data. In the ePhoneBook Sample the 'PhoneBookModel' class represents the properties of a “Phone Book” in the application and may expose properties such as First Name, Last Name and Mobile Number etc and also it may expose methods.
The View
The View is responsible for creating the response HTML or any responses back to the browser like pdf, html or excel etc. In other way we can sat that the view is responsible for transforming a model or models into a visual representation.
The Controller
Controller is responsible for processing user inputs from view and give responses back to the view. It means that the controller decides the action and performs the tasks/logic based on the parameters.Controller acts as the coordinator between the view and the model.
Comparing ASP.NET MVC with ASP.NET Web Forms
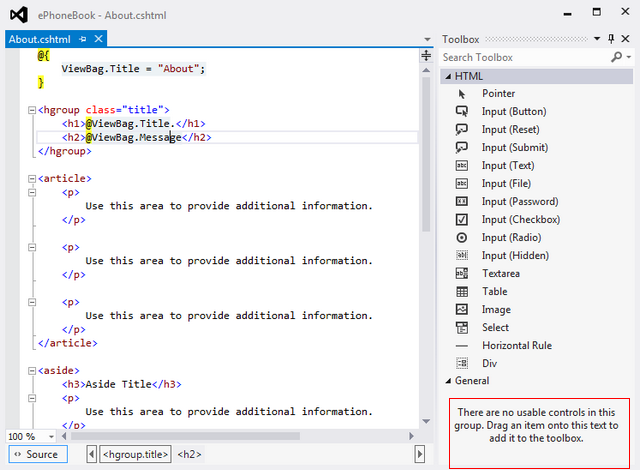
If you have already worked with ASP.NET Web forms then you might be interested to see some comparisons between these two. The main thing is that both ASP.NET Web form and ASP.NET MVC are built on top of ASP.NET Framework. There are some similarities and differences between these two. ASP.NET Web forms web development is very easy compared to ASP.NET MVC apps. and Web forms doesn't require a developer to be an expert in JavaScript and HTML to write a web application but ASP.NET MVC is full of scripting technologies and it requires a good command over scripting technologies.ASP.NET Web form is very rich with server controls but in ASP.NET MVC there are no server controls supported and its fully depend on HTML controls. If you look at the below image you can see that no server controls are present in the toolbox.
There is no View State in ASP.NET MVC. we can use HtmlHelpers in ASP.NET MVC for rendering HTML controls in a view. ASP.NET MVC is based on Separation Of Concerns that's why ASP.NET MVC is pluggable and flexible system. Implementing Test projects with ASP.NET MVC is simple than Web forms.
ASP.NET MVC request cycle is very simpler than Web forms and MVC gives a good performance. In my opinion I feel for a Web form developer, ASP.NET MVC is difficult to learn and understand as its much into coding not much drag and drop but once its fully understood then its very easy.
Layout page is the Master page available in ASP.NET MVC and partial
views can be considered as a replacement of user control in Web
form. Web form uses normal Web-form syntax where as MVC app uses
customizable syntax default to Razor.
There are many more similarities and differences, Once you start writing code with ASP.NET MVC you will learn more. Creating an ASP.NET MVC Application – ePhoneBook
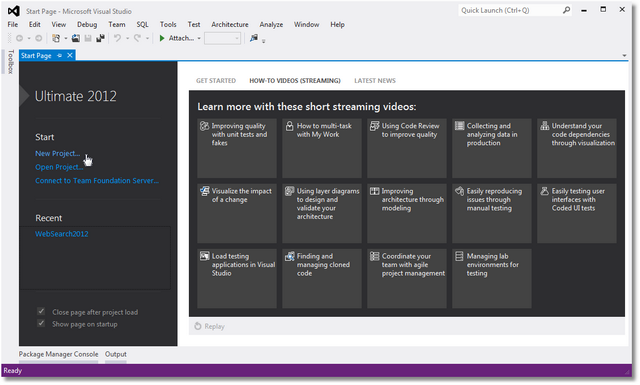
In this article all screen shots are based out of Visual Studio 2012 but If you are using Visual Studio 2010 then you will find similar UIs there too.To Create a new MVC 4 application we need to click on 'New Project' menu. 'New Project' menu can be accessed from the start page itself or File->New->Project menu.
The below given image shows how to create a New Project from start page.
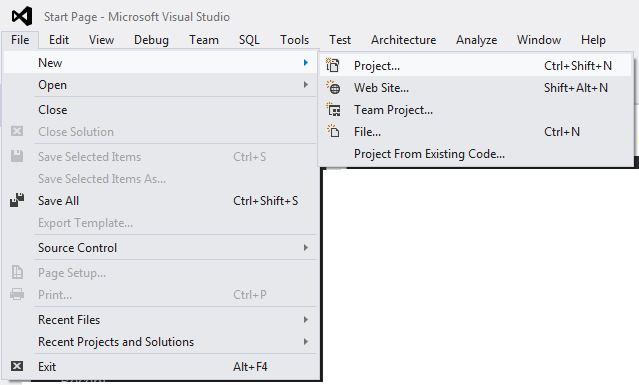
Creating New Project from File->New->Project.
Clicking on New Project menu will show a popup for selecting the
required type of Project from the installed templates list. We can
create Windows Application or normal ASP.NET Web Application etc
using this popup but now we are more interested to create a new
ASP.NET MVC 4 Web Application from scratch.
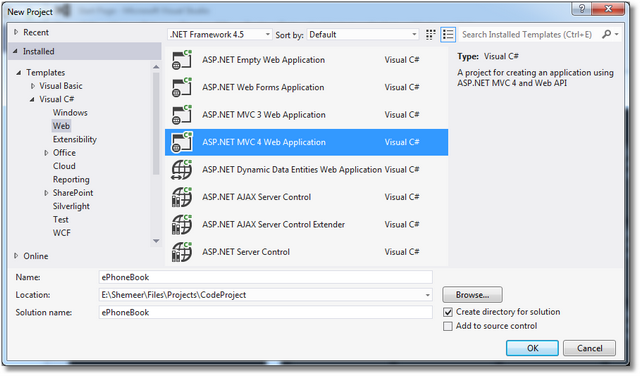
Give a proper name for this new MVC 4 application and click 'OK' button. I have given 'ePhoneBook' name as I'm going to use this project for all my MVC 4 series.
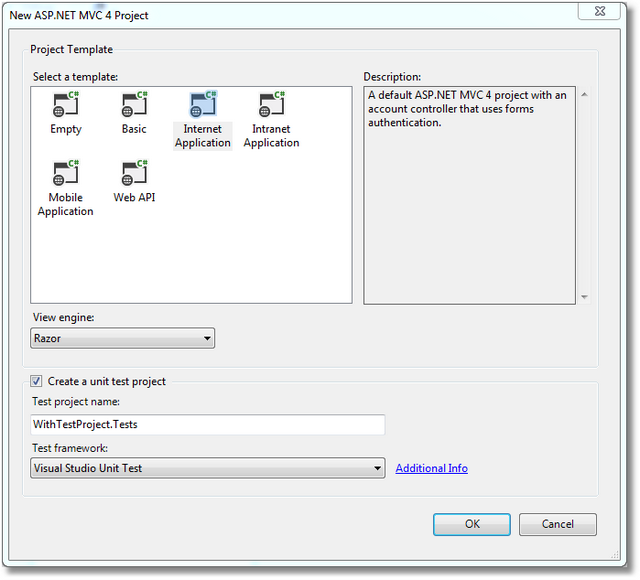
When you click 'OK', you’ll be presented with another dialog with Project Templates
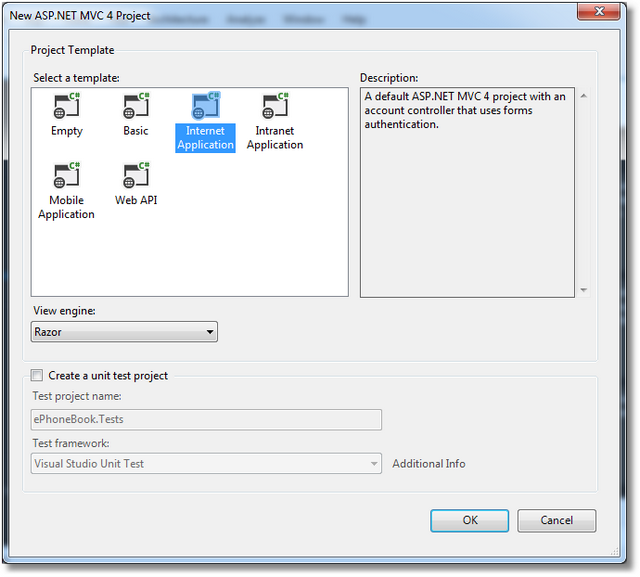
Select appropriate Project Template (discussed in another section), View Engine and also if you want you can opt for creating a Test Project for this application. You can create a test project later also if you don't want to do right now. I have selected the Internet Application with Razor View Engine.
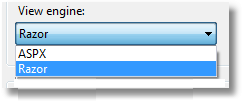
What's a View Engine?
View Engine are responsible for rendering the HTML from your views to the browser. The view engine template will have different syntax for implementation. Currently there are few number of view engines available for MVC and the top four view engines are Razor, traditional ASPX, Spark and NHaml. I have written another article on comparison of different view engines.
Razor is the preferred View Engine for MVC, ASPX View Engine is the legacy View Engine and this option is there for backward compatibility.
I will be explaining more about Razor on another article.
Once you click 'OK' after selecting the appropriate project template
Visual Studio will create a MVC Web Application project with default
files and folders as per the Template Selection.
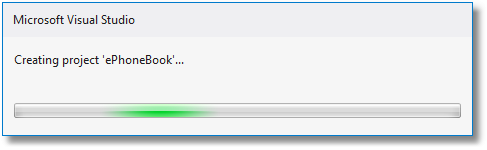
If look at the visual studio status bar you can see that the project
creation progress and the files adding to the project. ASP.NET MVC 4
project template is using Nuget Package Manager to install and
manage the assembly references in your application. the below files
in status bar adding by Nuget.

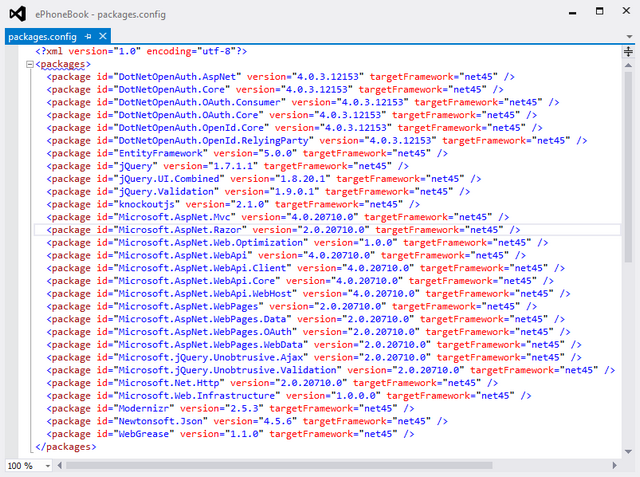
Package.Config File contains the list of the Nuget Package used in this project.
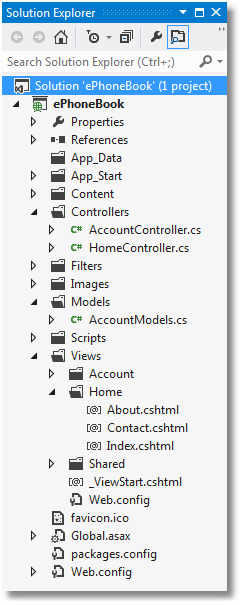
Now Visual Studio created our project in place and the solution file looks like ,
I have explained the Project Items/ Application folder structure in another article, before continuing with our newly created project I just wanted to explain the Project Templates.
Project Templates
Currently MVC 4 Application in Visual Studio 2010 and Visual Studio
2012 offers 6 different types of project templates. (Previously it
was 7 but the final version of MVC 4 doesn't shipped with ASP.NET Single Page Application due to some compatibility)
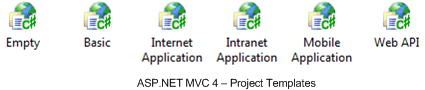
I will be explaining the Basic, Empty, Internet Application, Intranet Application, Mobile Application and Web API project templates here.
 Empty
Empty The Empty template created the minimum references and resources required to run an Asp.net MVC application.As you can see in below image, Models, Controllers, App_Data are completely empty folders and View folder only contains web.config and a Global.asax file and web.config.App_Start folder contains 3 configuration files ( FilterConfig.cs, RouteConfige.cs and WebApiConfig.cs ).
This option will be good if you plan to create everything from scratch.
Basic
After comparing the Empty project image and Basic project image
we can say that The Basic template is somewhat similar to Empty
template. In addition to the Empty project , Content , Script folder
are present in this template and Shared folder is present inside
Views and also in App_Start folder apart from the three files in
empty template, basic template added one more file named BundleConfig.cs
(Bundling and minimization).

Same like Empty Template,this option also good if you plan to create everything from scratch.
Internet Application
The Internet Application extends Basic Template with two
controllers( Account controller and Home controller) with all the
logic and functionality implemented in actions and views. In this
template membership management functionality gives the option to user
to register and login, change password etc in the website.
It's a template used usually to start a normal web project in action.
Intranet Application
The Intranet Application template is same like the Internet
Application template, except that it is preconfigured to use
Windows-based authentication.
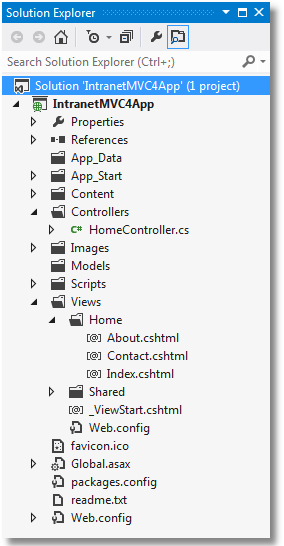
This template will be a good option if you plan to create an intranet web site.
Mobile Application
The Mobile Application template is another variation of the Internet
Application template. This template, however, is optimized for
mobile devices and includes the jQuery Mobile JavaScript framework
and views that apply the HTML that works best with jQuery Mobile.
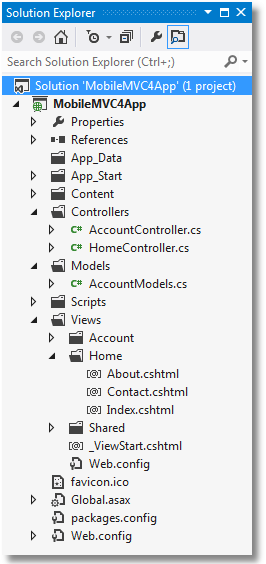
If you plan to target touch based mobile devices then this template is the right option.
Web API
The Web API template is yet another variation of the Internet
Application template that includes a preconfigured Web API
controller.ASP.NET Web API is a framework that makes it easy to build
HTTP services that reach a broad range of clients, including
browsers and mobile devices. ASP.NET Web API is an ideal platform for
building RESTful applications on the .NET Framework.
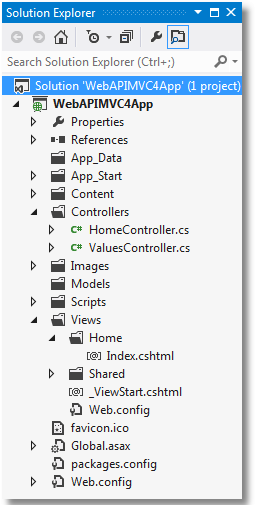
Web API is a great choice for quickly and easily creating data services that your AJAX-enabled applications can easily consume.
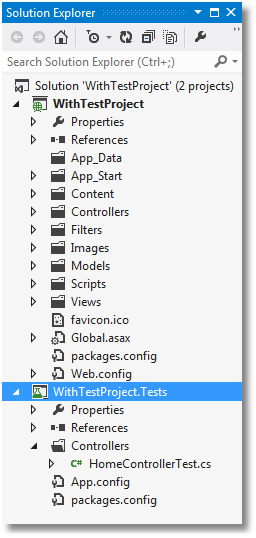
If we want to create a Test project while creating the MVC project itself then we need to mark the Create Unit Test Project Check box. If you don't want to do this at the first time you can add a unit test project later also.
If we are creating MVC Application with Test project then the solution explorer will look like below .
Running our first Application
Now we will run our newly created ePhoneBook application. We can run this in debug mode or without debug. To run this go to the Menu Debug->Start Debugging/Start without debugging.
 You can also use the shortcut key F5 / Ctrl + F5 to run this application
The
run command is also there in the Standard Toolbar, the below
given image shows the run toolbar in VS 2012 IDE.
You can also use the shortcut key F5 / Ctrl + F5 to run this application
The
run command is also there in the Standard Toolbar, the below
given image shows the run toolbar in VS 2012 IDE.
 The below given image shows the run command in standard toolbar of VS 2010
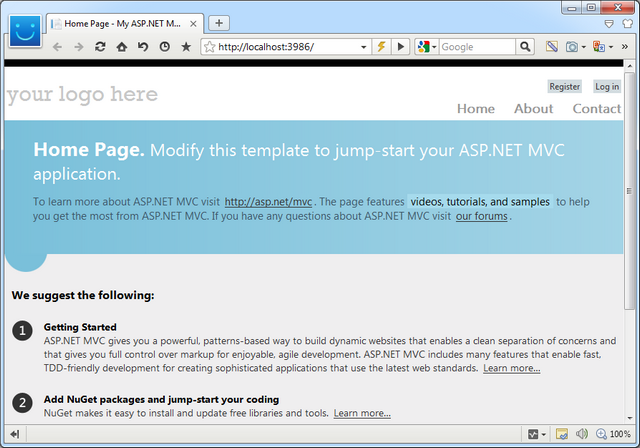
 Once you have run the application you can see the below Home page
 If
you want to debug your application then you need to set
a break-point at the location where you want to hit the
debugger.
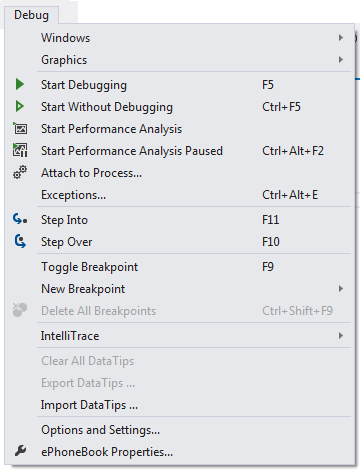
To set breakpoints just go to the menu Debug->Toggle Breakpoint.
If
you want to debug your application then you need to set
a break-point at the location where you want to hit the
debugger.
To set breakpoints just go to the menu Debug->Toggle Breakpoint.
 You can use the shortcut key F9 also for the same. you might want to note the short keys for Step Into (F11) and Step Over (F10). Once you hit the breakpoint you can resume debugging by pressing F5.
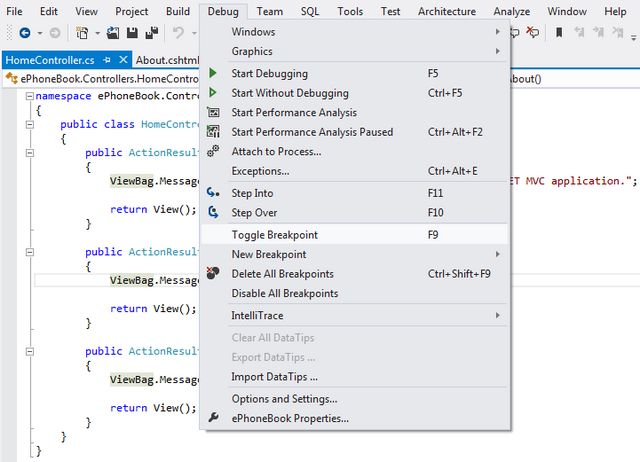
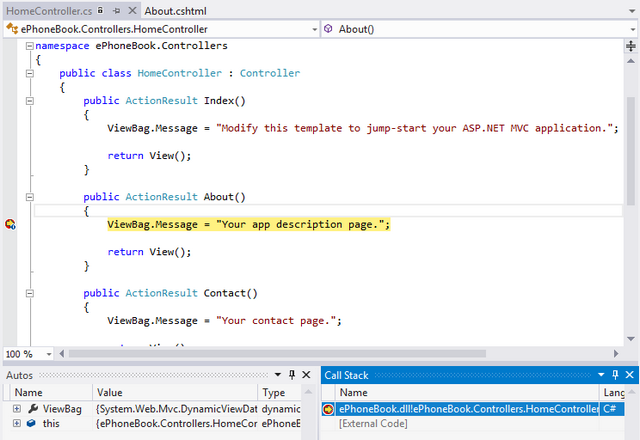
To
demonstrate the debugging I have placed two breakpoints, one
in Home Controller – About() and About.cshtml. When I clicked on About
Menu the first break point got hit.
You can use the shortcut key F9 also for the same. you might want to note the short keys for Step Into (F11) and Step Over (F10). Once you hit the breakpoint you can resume debugging by pressing F5.
To
demonstrate the debugging I have placed two breakpoints, one
in Home Controller – About() and About.cshtml. When I clicked on About
Menu the first break point got hit.
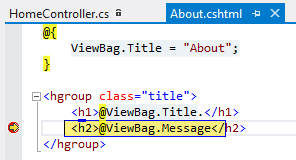
 You can Step Over by F10 or just resume to the next breakpoint by F5. I pressed F5 and the second breakpoint got hit.
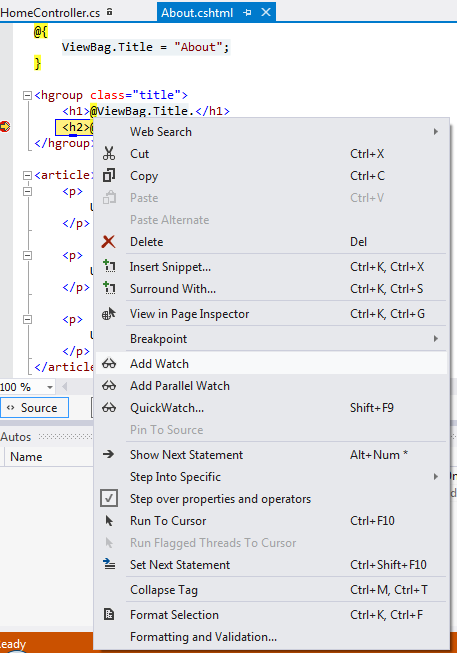
 If you want see the value then you can see in watch window and also there are other windows too, to add a object to Watch Window, select the required object and right click and click on AddWatch.
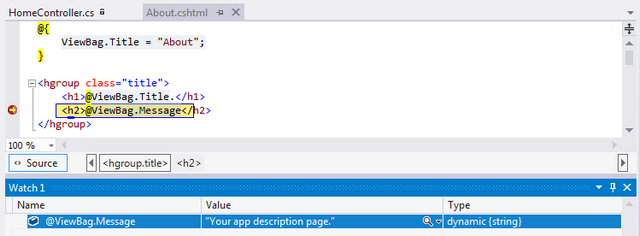
 Once you have placed the object in Watch window you can see the current value in that window
 If you resume your breakpoints you can see the About page in action,
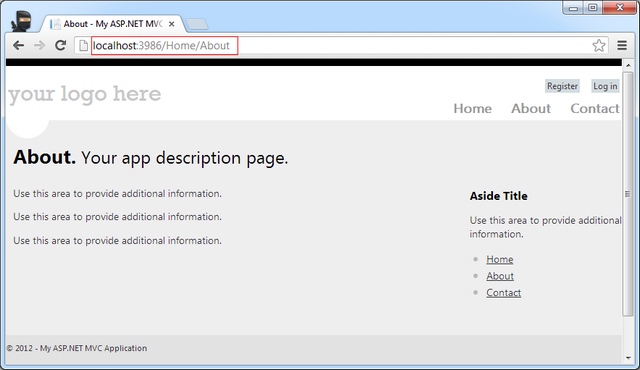 Have you noticed that the url is very user friendly with no extensions and all. The ASP.NET MVC routing takes care of this URL routing. Read more on routing on MSDN.
To stop debugging you need to press Shift + F5 or go to the Debug menu and click on Stop Debugging.
Have you noticed that the url is very user friendly with no extensions and all. The ASP.NET MVC routing takes care of this URL routing. Read more on routing on MSDN.
To stop debugging you need to press Shift + F5 or go to the Debug menu and click on Stop Debugging.
 Stopping Debugging from the standard toolbar
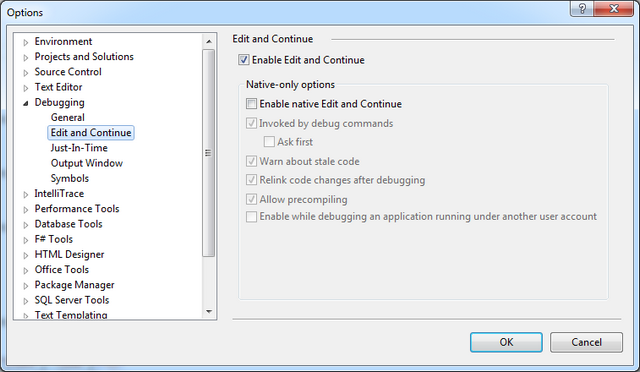
 If you want to make any changes while debugging then you can edit and continue the application, if that option is enabled. to check this option is enabled or not, go to Tools->Options then
 In ASP.MVC, Layout is used to give similar look and feel for the
entire application this was called master page in ASP.NET
Web forms. Below given the Layout page in our application,
In ASP.MVC, Layout is used to give similar look and feel for the
entire application this was called master page in ASP.NET
Web forms. Below given the Layout page in our application,
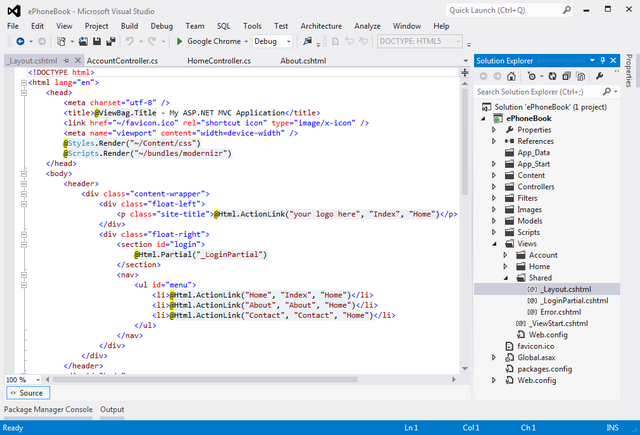 You can see that the Menus like Home, About Contact was shown from this Layout. So how this page is called? So where the content page is placed, it’s simple, the
 @RenderBody mentioned that the content page will be displayed in that area.
 This Layout can be mentioned in individual views or in
 _viewstart file. The ViewStart file called the Layout in below syntax,
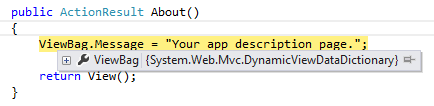
 While debugging our application we have noticed something named ViewBag. It's a dynamic data dictionary.
 As we have used Internet Application Project template the code is generated with Membership management. Let’s have a look into that.
_viewstart file. The ViewStart file called the Layout in below syntax,
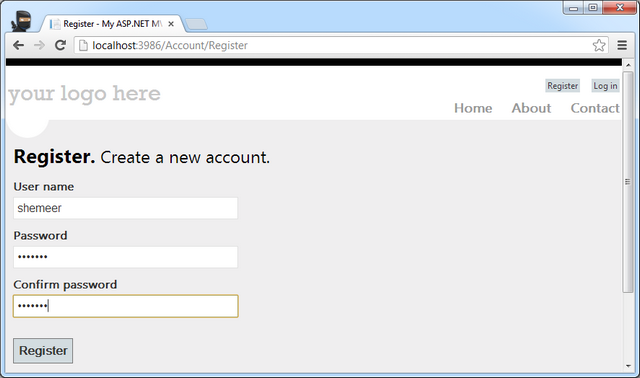
Now I’m going to create a User named Shemeer using the Register link.
 If you want you can place a breakpoint on AccountController’s register action. When I click ‘Register’ Button it reaches the
 WebSecurity.CreateUserAndAccount().
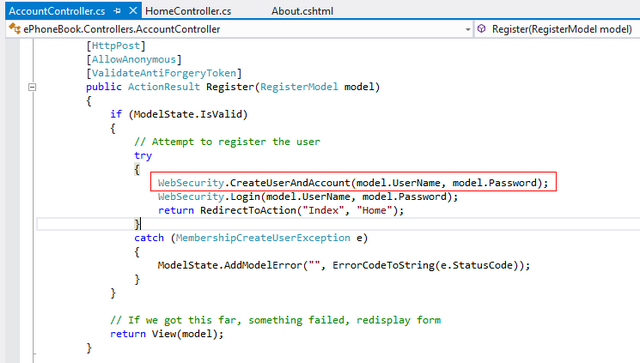 This method saves my credential to the
 aspnet* database. Wondering J this database was created automatically as part of memebership management and this database by default resides under the App_Data folder.
 And the connection string has been created inside the web.config also
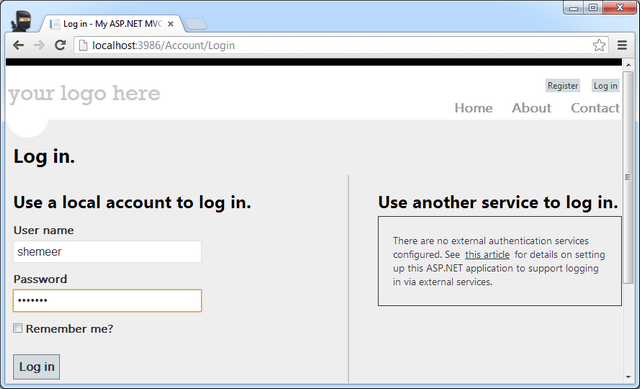
 Now I'm trying to login using the Login page
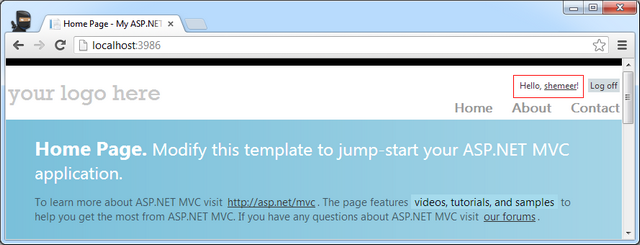
 I’m able to login and my user name is showing in right top corner as logged in
Modifying our first MVC 4 Web Application
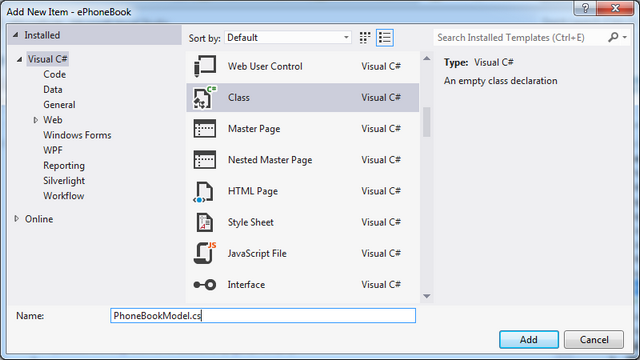
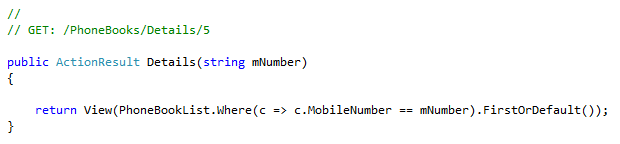
Apart from the generated code I’m just going to add some more pieces to this MVC Web Application. I will be publishing a full fledge ePhoneBook on ASP.NET MVC 4 later. This sample code will help you to get more understanding on MVC 4.The first thing I’m going to do is adding a PhoneBook Model class .
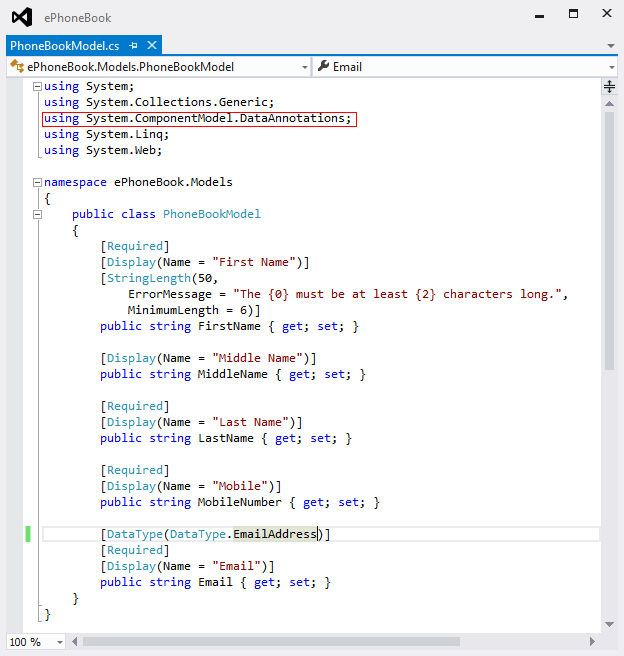
System.ComponentModel.DataAnnotations. There are multiple validation attributes available and all are self-descriptive.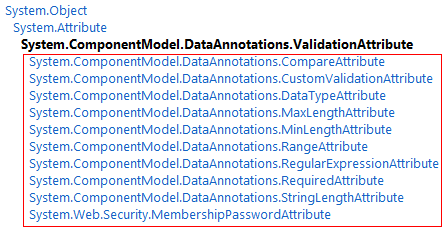
The above image shows the available validation attributes. Read More on Validation Attribute from MSDN.
Now
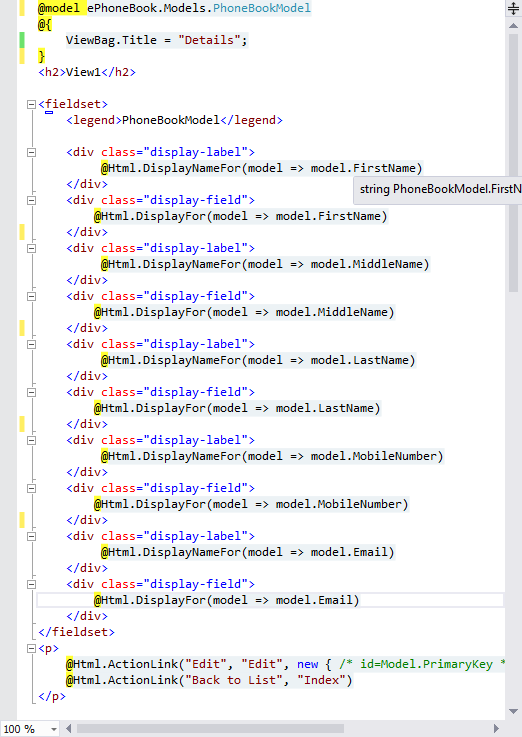
let’s add required views (Create, Edit, Delete, Details, List), to add
the views just right click on the View folder and click on Add->Views
menu. 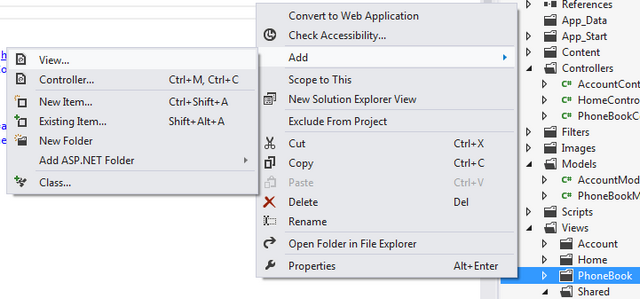
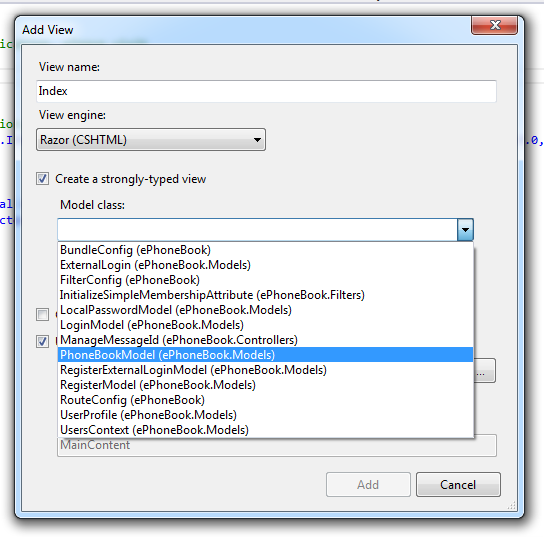
Now I’m going to add the Listing view, I have given the View Name
as “Index” and selected the 'create a strongly typed view' Model from
the Drop-down so that the code will be generated accordingly to the
Model. If the created PhoneBookModel is not showing in the dropdown then
build the application and then check.
Now we can specify which
scaffolding template to use so that the code will be generated as per
the template , I have selected “List” template like below
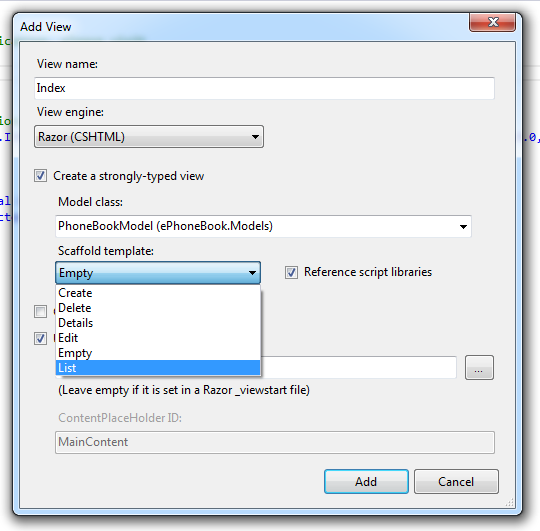
When you click on ‘OK’ button the Index.cshtml is ready.
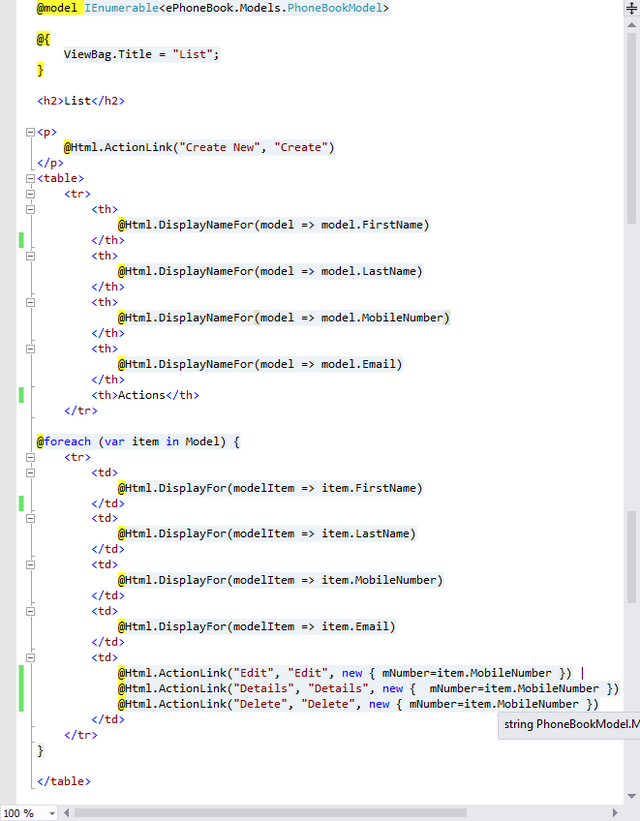
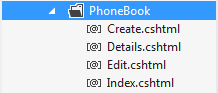
The same way I have added all files for this sample project
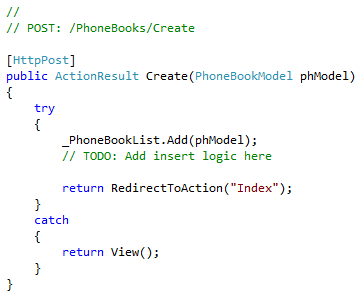
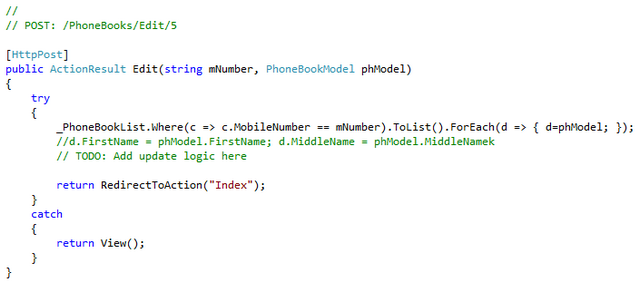
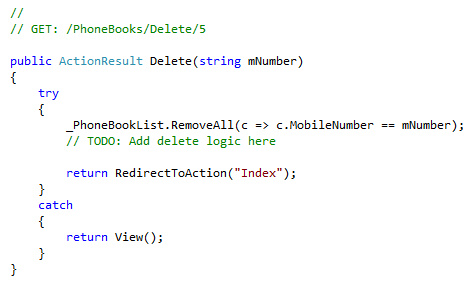
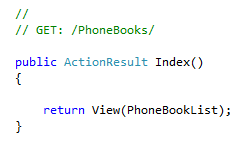
Now we need to add Controller actions for these scaffolding items.
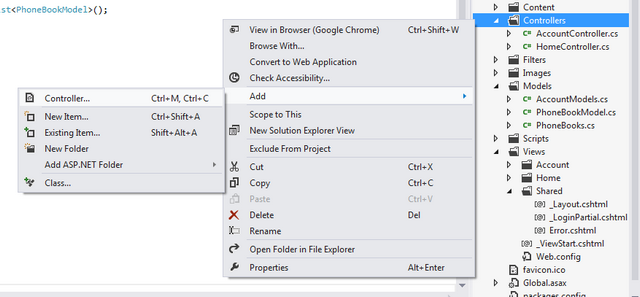
Click on the Add->Controller menu, once you have clicked on that menu then a popup will be shown like below ,
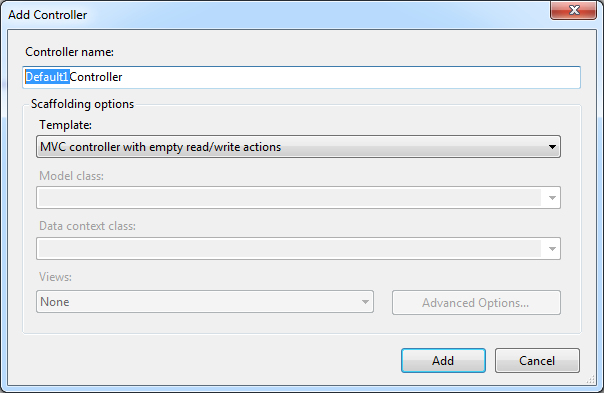
I choosed “MVC controller with empty read/write actions” controller template Now give the controller name as PhoneBookController. Note that MVC requires the name of all controllers to end with "Controller".
- Empty MVC controller
- MVC controller with read/write actions and views, using Entity Framework
- MVC controller with empty read/write actions
- Empty API controller
- API controller with read/write actions and views, using Entity Framework
- API controller with empty read/write actions

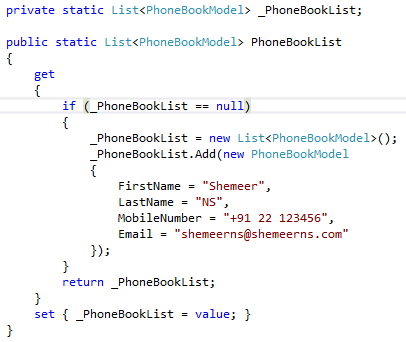
Now I’m going to modify the newly added controller file, the first thing I have added a property that will have a default values for the ePhoneBook
- ContentResult
- EmptyResult
- FileResult
- FileContentResult
- FilePathResult
- FileStreamResult
- HttpUnauthorizedResult
- HttpUnauthorizedResult
- HttpNotFoundResult
- JavaScriptResult
- JsonResult
- RedirectResult
- RedirectToRouteResult
- ViewResultBase
- PartialViewResult
- ViewResult

_Layout.cshtml. Once this all done let’s “Run” our modified application, 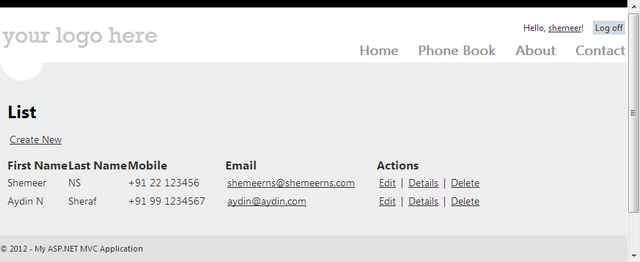
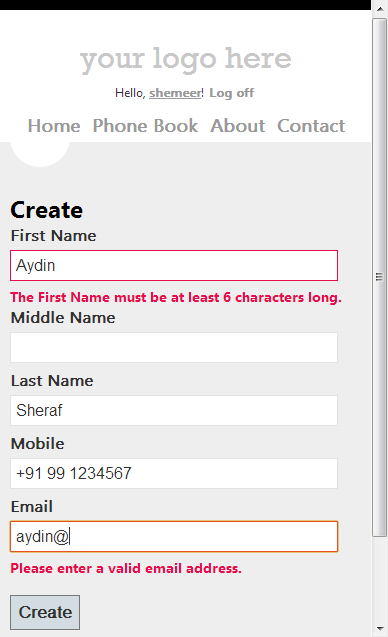
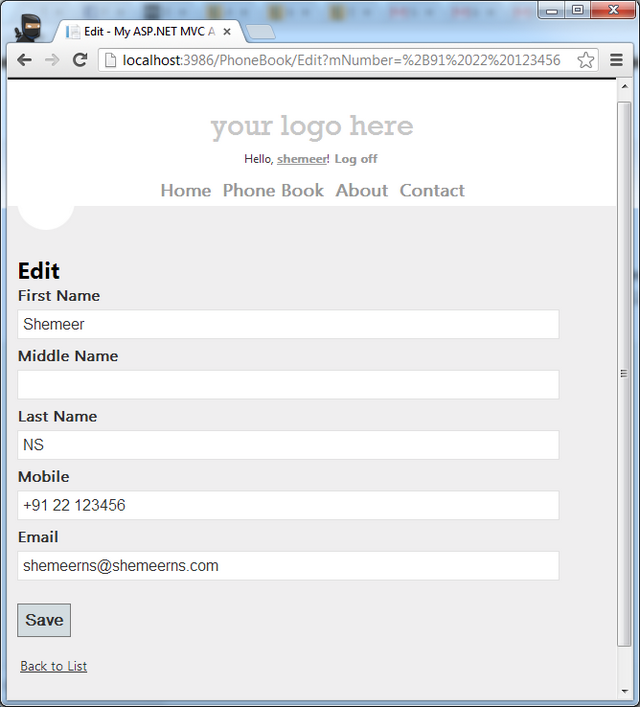
Table Of Contents
- Application Information
- Special Folder
- ASP.NET Platform Folder
- App_GlobalResources Folder
- App_LocalResources Folder
- App_Browsers Folder
- App_Themes Folder
- App_Data Folder
- App_Code Folder
- Application Folders
- App_Start Folder
- Areas Folder
- Content Folder
- Controllers Folder
- Filters Folder
- Images Folder
- Models Folder
- Scripts Folder
- Views Folder
- Configuration files
- Summary
Introduction
ASP.NET MVC relies on Convention over Configuration. If you want to make your website development easy and productive it's important to understand the Project Items or Application Folder Structure of an ASP.NET MVC Application. In this article I will explain the Project Items of an Internet Application Template of ASP.NET MVC 4. If you are new to MVC then you might want to check my previous article on Introduction to MVC 4.I hope you will enjoy this article.I have put my time and efforts on all of my articles, Please don't forget to mark your votes, suggestions and feedback to improve the quality of this and upcoming articles.
Overview – Project Items
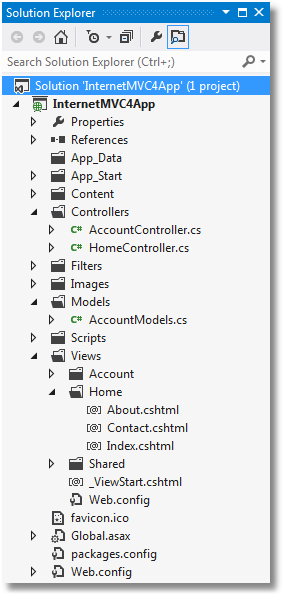
While creating a new application, as of now there are six different Project Templates available with ASP.NET MVC 4 . If you have not yet explored all the project templates with MVC 4, please check my MVC 4 - Introduction article.All project templates gives a common structure, some of the templates are having some different files and or folders for specific purpose. The below given screen-shot is of Internet Application Template of MVC 4.

It’s very important to know the structure of application and file/folder conventions. In this article I’m going to explain all the above project items from a beginner’s perspective. For getting a clear picture I have added more files and folders to the newly created solution. Some of the folders are not exactly useful for ASP.NET MVC but still I have added that folders too so that a new comer also can understand which is used for what. Lets explore the Files/Folders from the above Solution (InternetMVC4App).
Note: The attached files doesn't have any functionalities implemented, it's just the application used for this article.
Solution File

Solution is a grouping of one or more projects that work together to create an application. In a simple way we can say a solution is a structure for organizing projects in Visual Studio.

Read more from MSDN.
Project File

The
project file is an XML document that contains all the information
and instructions that MSBuild needs in-order to build your project,
like the contents to include, the platform requirements, versioning
information, web server or database server settings, and the tasks that
must be performed. Every Visual Studio project includes an MSBuild
project file, with a file extension that reflects the type of
project—for example, a C# project (.csproj), a Visual Basic.NET
project (.vbproj), or a database project (.dbproj).
Read more from www.asp.net. Properties Folder

When talking about the "Properties" Folder, the first thing I wanted to mention is the
AppDesignerFolder entry in project file in our case .csproj file.
Properties folder is the first folder in the project node. If you
expand the "Properties" Folder, you can see a file named
AssemblyInfo.cs.
The
AssemblyInfo.cs
contains the details related to assembly version information and
other information about the assembly that will be displayed in detail
section of properties window of the assembly. The content of
AssemblyInfo.cs is given below, 
The below given screenshot shows the assembly version details in the 'properties' window of assembly file.

If you double-click on this folder then it will show
Project Properties page instead of expanding it. Click here to view larger image 
If required, the properties folder name can be renamed but we need to update the .
csproj file accordingly. If you are deleting the file AssemblyInfo.cs or folder Properties
then the assembly details won’t be available in the details tab.
The below given screenshot shows the assembly version details after
deleting the folder or file.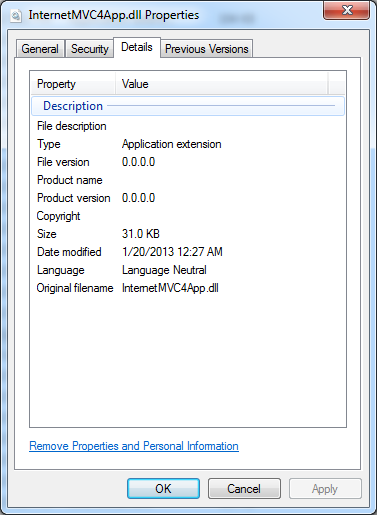
The above image shows default values for assembly details.
Reference Folder

These
are assemblies that have been referenced in our current project.
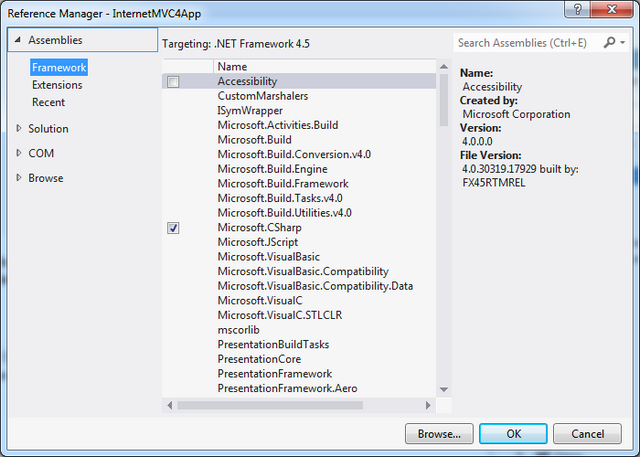
If you want to add any assembly reference or any service (WCF / Web Service) reference you can add it from here. To add an assembly reference just right click on the Reference folder and click on the 'Add Reference' menu, please refer the below screenshot. 
Once
you click on the above (Add Reference) menu then a popup will be shown
like below screen, select the required assembly and click on OK.
If
you wanted to add a service reference then click on 'Add Service' menu,
once you clicked on 'Add Service ' menu, you will get a screen a screen
like below where you can give the service URL,

give the service URL ( you can give
.svc or .asmx
URL here) if you want to get the old Add Web Service menu
then click on 'Advanced' option there you can see the 'Add Web
Reference' menu.  After clicking on 'Add Web Reference' menu , now you got the old Web Service screen where you used to give .asmx URL.  |
App_Browsers Folder

App_Browsers folder contains browser definitions ( .browser files). Browser definition files contain definitions for individual browsers. At run time, ASP.NET uses the information in the request header to determine what type of browser has made the request. Then ASP.NET uses .browser files to determine the capabilities of the browser.
Browser definition files were introduced in .NET Framework version 2.0. In earlier versions of the .NET Framework, the browserCaps element was used to define browser definitions in configuration files.
You can find existing browser definition files at
%SystemRoot%\Microsoft.NET\Framework\[VERSION]\Config\Browsers\ here [VERSION] is the framework version that you have already installed.
If you want to change the definitions of any of these browser definition files, Just copy the appropriate file to our project's App_Browsers folder and modify the definition as per the requirement. The below screen shot shows the content of newly added BrowserFile1.browser file, We can see that it's just an XML file that describes the capabilities of the browser.

Read more on Browser Definition File from MSDN.
App_Code Folder

App_Code
is used for keeping class files , typed objects etc. Code from the
App_Code folder is referenced automatically in our application.The
App_Code folder can contain subdirectories of files, which can include
class files that in different programming languages (eg:- .cs,.vb).
As
per my understanding App_Code is not really meant for Web Application
Projects, if we are using App_Code in WAP (Web Application Project) then
we need to change the "Build Action" to 'Content' from 'Compile' to
work everything as expected, Read more on Shared Code Folders in ASP.NET Web Site Projects App_Data Folder

To add an ASP.NET Folder you can refer the below screen-shot,
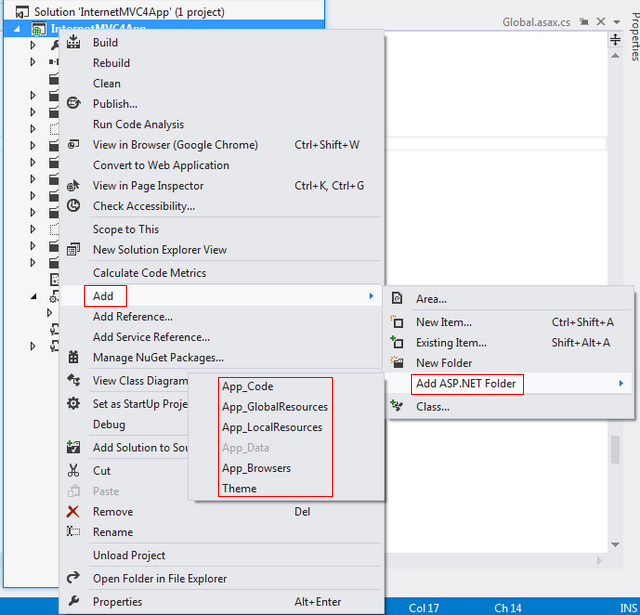
The folder will be disabled if already that folder is added. You can see that the App_Data is disabled as its already exists in our application.
This folder is meant for keeping data files such as XML, .mdf, .mdb files. In our default MVC template this folder is used to manage membership and role information. If you are using App_Data folder then you can mention the folder as |DataDirectory| (enclosed in pipe symbols) in connection string. |DataDirectory| is a substitution string that indicates the path to the App_Data folder. The files from the App_Data folder are safe as IIS will not process any files from this folder. You can find a sample code of DataDirectory in a project here App_Data in real application.
App_GlobalResources Folder

App_GlobalResource Folder contains resources (.resx and .resources files) that are compiled into assemblies with global scope. Resources in the App_GlobalResources folder are strongly typed and can be accessed programmatically
Read More on Web Page Resource from MSDN
App_LocalResources Folder

App_LocalResources Folder contains resources (.resx and .resources files) that are associated with a specific page, user control, or master page in an application.
Read More on Web Page Resource from MSDN
App_Start Folder

This folder is just a convention and it separates some code from Global.asax,

And
also we can avoid touching Global.asax file when using any new nugget
packages that needs to use Application_Start from Global.asax
AuthConfig.cs
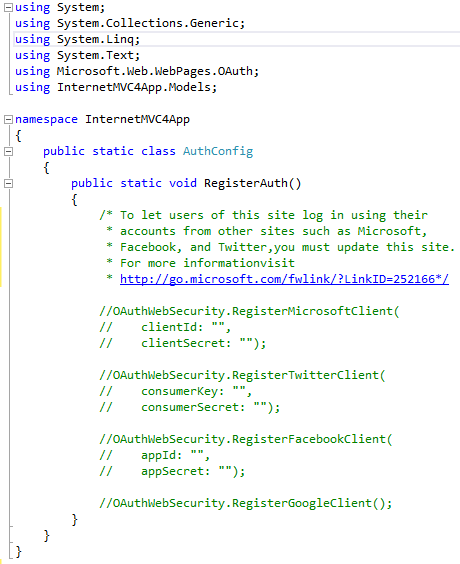
AuthConfig.cs files helps us to login with our social networking sites like Facebook, Twitter, Google etc.
BundleConfig.cs
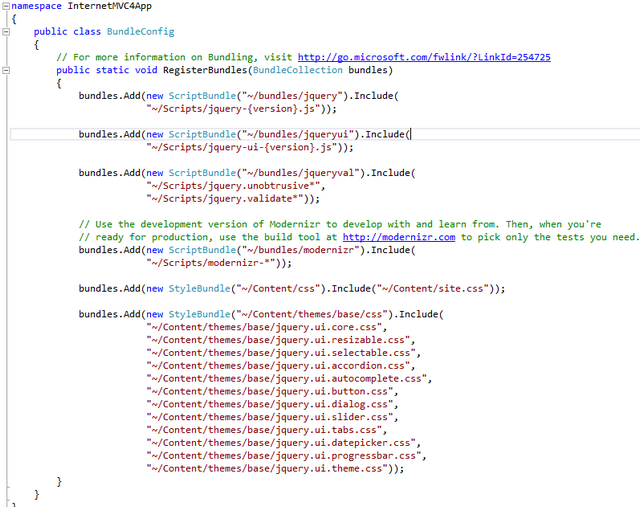
BundleConfig.cs is used to register bundles used by the Bundling and Minification. The below given image shows how the scripts are adding in the .
cshtml file. 
FilerConfig.cs
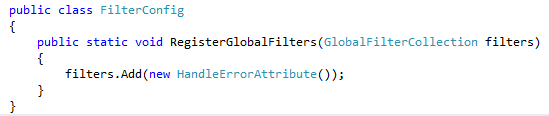
FilerConfig.cs is used to register global MVC filters.
RouteConfig.cs,
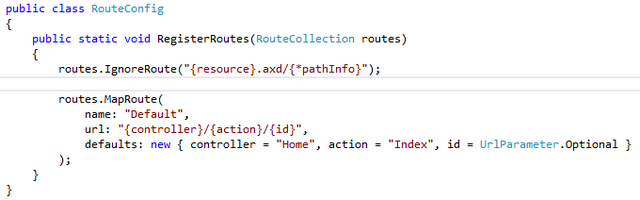
Routes are registered in RouteConfig.cs
WebApiConfig.cs

WebApiConfig.cs is used to register Web API routes.
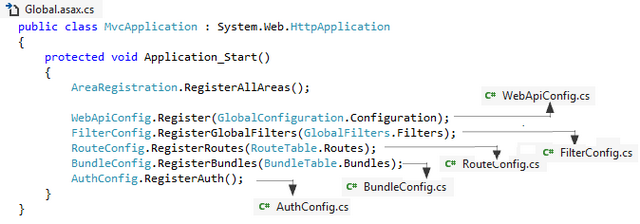
The
main purpose of App_Start and containing files are to move
configuration logic from Global.asax to set of static classes in the
App_Start directory.
App_Themes Folder
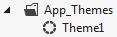
App_Theme folder is used to apply styles/themes to web application. We can have multiple themes created for our application and also if we want we can problematically change the theme of our application. We can apply the theme from the web form or from the web.config file.
App_Themes folder is used in regular ASP.NET but there are other different ways also to implement themes in ASP.NET MVC .
Read more on MSDN
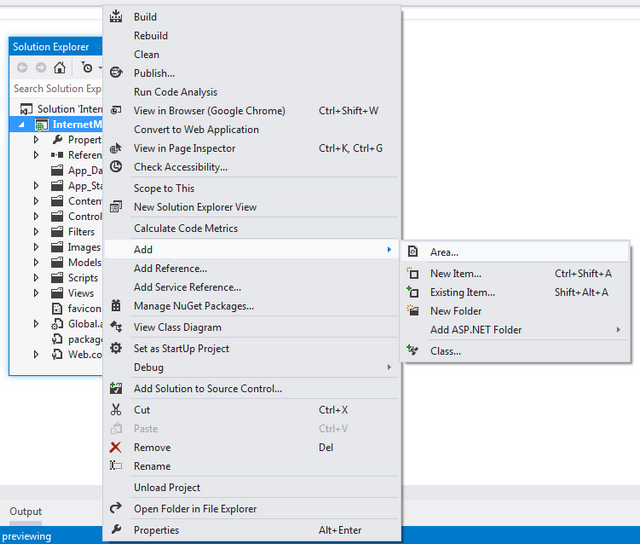
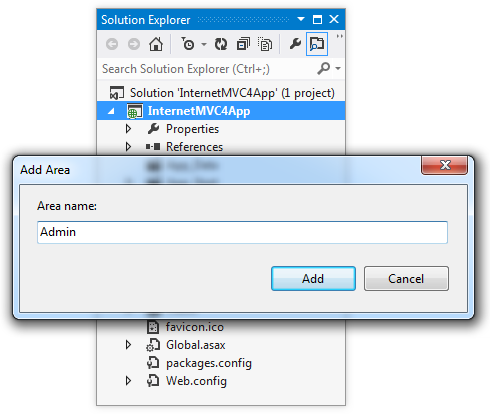
Areas Folder
ASP.NET MVC allows us to partition our web application into smaller parts using "Areas" Areas provide a way to separate a large MVC Web application into smaller functional groupings. An area is effectively an MVC structure inside an application. An application could contain several MVC structures (areas).You can add an Area to a ASP.NET MVC project as shown below
I have named the area as "Admin" and after clicking on "Add" button a folder created with "Areas" with subfolder "Admin".
The created "Area", "Admin" have all the entries/folders/files to work the RazorViewEngine properly
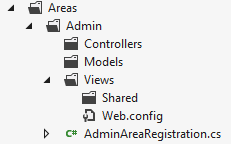
The file "AdminAreaRegistration.cs" auto generated code is given below,
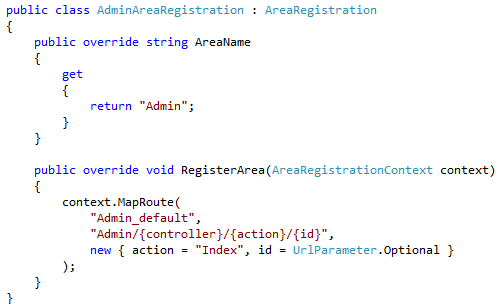
The "
AreaRegistration.RegisterAllAreas(); " entry in Global.asax's Application_Start will take the responsibility of registering all the Areas. Read more from MSDN.
Bin Folder

Normally
this folder won’t be listed in solution explorer until you click on
‘Show All’ menu. To get the "Show All" menu click on the Project Menu
like below,

Other wise you can also get the menu from the Solution Explorer itself.

The compiled assembly for your MVC application is placed here, along with any referenced assemblies that are not in the GAC. This folder contents are not served by IIS. Click here to the contents of bin folder.
Content Folder

This is where we put our static contents like CSS, Images. This folder is just a convention and it’s not mandatory to put our static files in this folder..
Controllers Folder
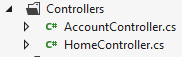
This
is where we put our controller classes. This folder is just a
convention we can create our controller classes any where in the
application. MVC will recognize any class that implements the
IController interface as a Controller regardless of the location.
Filters Folder

Images Folder

All Images are kept in this folder and this folder is being referenced from the Content\Site.css.
Models Folder
This is where you put your view model and domain model classes. This is a convention and we can define model class anywhere in the project or in different project also.
Scripts Folder

This directory is intended to hold the JavaScript libraries for your application. When we created our application itself Visual Studio added many JavaScript libraries like jQuery, knockout etc. This is just a convention.If we want we can keep this all in other folder also.
Views Folder

/Views/Shared
This directory holds layouts (master-page in-terms of web forms) and views which are not specific to a single controller.
/Views/[FolderName]
Views or Partial Views specific to that folder or single controller.
/Views/Web.config
This is not the configuration file for your application. It contains the configuration required to make views work with ASP.NET and prevents views from being served by IIS.
FavIcon File

This is the favicon for our web application.
Global.asax File

This is the global ASP.NET application class. Its code-behind class (Global.asax.cs) is the place to register routing configuration, as well as set up any code to run on application initialization or shutdown, or when unhandled exceptions occur.
Packages.config File

This file is used by NuGet. While creating the project itself the IDE interanlly used NuGet for installing packages. This file is used to track the installed NuGet packages with their respective versions.
Web.config File

Web.config is the main settings and configuration file for an ASP.NET web application
Table Of Contents
- Introduction
- Razor
- ASPX
- Syntax/Usage
- Comment
- Code Block
- Code and Markup
- Text and Markup
- Html Encoded
- Html Unencoded
- Dynamic value inside an Html Attribute
- Explicit Expression
- File Path
- Conditional Statements
- Looping Statements
- Calling ServerSide Method
- Creating a Delegate
- Creating a Method
- Escape Character
- Comparison
- Conclusion
- Using attached Code
- References
- Summary

Introduction
View Engines are responsible for rendering the HTML from your views to the browser. The view engine template will have different syntax for implementation. Currently there are few number of view engines available for MVC and In this article we will go through the Razor and ASPX view engine. I have listed some of the available view engines for ASP.NET MVC in another article , click here read more on different view engines.In this article I will take you through the Razor, the most opted view engine and the ASPX, the legacy view engine.
@Razor
The Razor view engine is an advanced view engine from Microsoft, packaged with MVC 3. Razor using an@ character instead of aspx's <% %>
and Razor does not require you to explicitly close the code-block, this
view engine is parsed intelligently by the run-time to determine what
is a presentation element and what is a code element. In my opinion Razor is the best view engine available for MVC as its much cleaner and easy to write and read. This view engine is compatible with unit testing frameworks. It is very difficult to implement unit test with ASPX view engine and the other available view engines doesn't provide anything related to testablity in their respective sites.
This is the default view engine in MVC 3 and MVC 4. Web pages with Razor syntax have the special file extension
cshtml (Razor with C#) or vbhtml (Razor with VB). <%ASPX%>
The syntax for writing views with this engine is the same syntax that the ASP.NET Web Forms uses and the file extensions are also taken from ASP.NET Web Form (.aspx, .ascx, .master) . The coding will give us the memory of legacy ASP style. This is the default view engine for MVC 1 and MVC 2.
Let us start exploring the syntax differences and other major points.
Syntax/Usage
If you came from the legacy ASP style coding then you will feel much comfortable with ASPX View Engine and if you are comfortable with C# language then you can easily go with Razor view engine. Let's go thrugh how we can use Razor and or ASPX view engine in our application.Let's start reviewing some of the usages
Note: All code samples are given in C# language. All Sample code outputs are shown at the end. [Codes are for demonstration purpose and may not be following all best practices].
Comment
Comments in Razor syntax are delimited by@* *@ where as ASPX comments are delimited by <%-- --%>@*My Razor Comment*@
<%--My ASPX Comment--%>
If you are inside a C# code block then you can also use // and /* */ comment delimiters. The below code shows comments in side a c# code block.@{
//Razor
//Single line comment
/* Multi
line comment
*/
}
<%
//ASPX
//Single line comment
/* Multi
line comment
*/
%>
Code Block
We can easily write server side code blocks in the source html itself.@{
string ViewEngine = "Razor";
string CodeIn = "C#";
string SpanClass = "boldclass";
bool isMale = true;
string[] Products = new string[] { "Computer", "Mobile", "Watch", "Television" };
}
The above code decalares some server side variables and the variables are got initialized with appropriate data in it. The above code block is written in a
.cshtml file (Razoe C#). Below, the same code is written in .aspx (ASPX C#).<%
string ViewEngine = "ASPX";
string CodeIn = "C#";
string SpanClass = "boldclass";
bool isMale = true;
string[] Products = new string[] { "Computer", "Mobile", "Watch", "Television" };
%>
The above declared variables will be used in the coming sections.Code and Markup
When working in a dynamic web page we often required to mix code and html, This section will expalin how code and markup can be used together in ASPX and Razor view engine.Text and Markup
If you see the below code, I have used the previously declared variable inside an html tag and the view engine will intelligently parse the code in between the html tags.<span>@ViewEngine</span>
The above code is written for Razor(C#) and the below code will acheive the same in ASPX(C#) view engine. <span><%:ViewEngine %></span>
Suppose if you want to include a plain text inside a code block then we can use the <text> tag or @: for Razor view engine.@if (isMale)
{
<text>Sex:Male</text>
}
else
{
<text>Sex:Female</text>
}
The above code used <text> tag for adding a plain text inside a code block and we can acheive the same using @: also,@if (isMale)
{
@:Sex:Male
}
else
{
@:Sex:Female
}
In ASPX view engine we can simply acheive the above plain text functionality by the below code,<% if (isMale)
{ %>
Sex:Male
<% }
else
{ %>
Sex:Female
<% } %>
So now you might be thinking how can we have some expression with a plain text, well it's simple.I write code in @ViewEngine (@CodeIn)
I write code in <%:ViewEngine%> (<%:CodeIn %>)
The above code will rendered with the value of ViewEngine and CodeIn variable.Html Encoded
Html encoded values are acheived by the below codes.Raxor
<span>@ViewEngine</span>
ASPX<span><%:ViewEngine%></span>
If you don't want to encode the data then you can use the Html Unencoded format. Html Unencoded
In Razor@Html.Raw is used for rendering Unencoded values and in ASPX <%= %> is used for the same.<span>@Html.Raw(ViewEngine)</span>
<span><%=ViewEngine%></span>
Dynamic value inside an Html Attribute
If you came across a situation where the html element's attribute values needs to be changed conditionally then this approach will be very useful. Below, you can see the<span> element class is aasigned with a server side variable.<span class="@SpanClass">@ViewEngine</span>
The above code was written for Razor(C#) and the same can be achived for ASPX(C#) as below.<span class="<%:SpanClass%>"><%:ViewEngine%></span>
We can have other literals together with the server side variable. See the below example where @SpanClass evaluated to a string value and rendered with the string literals fontClass and blueClass.<span class="@SpanClass fontClass blueClass">@ViewEngine</span>
The below code shows the same in ASPX view engine.<span class="<%:SpanClass%> fontClass blueClass"><%= ViewEngine %></span>
below sample sets a boolean server side variables value as checkbox's checked property.<input type="checkbox" checked="@isMale" />
<input type="checkbox" checked="<%:isMale%>" />
Explicit Expression
Explicit expression is very useful in below situations, below sample code is written for Razor(C#). Here instead of a IF conditional statement I have used conditional operator inline.<span>Sex:@(isMale ? "M" : "F")</span>
Sample of explicit expression in ASPX(C#) <span>Sex:<%: isMale ? "M" : "F" %></span>
File Path
Form Razor2 we can easily use "~/" for file path where as before Razor2 we used the below codes for the same.Url.Content("~/...") or @Href("~/...")
Razor2"~/"
Conditional Statement
Conditional statement sample for Razor (C#).@if(isMale)
{
<p>Sex:Male</p>
} else {
<p>Sex:Female</p>
}
Conditional statement sample for ASPX (C#). <% if (isMale)
{ %>
<p>Sex:Male</p>
<% }
else
{ %>
<p>Sex:Female</p>
<% } %>
The above usage gives us a very easy approach for rendering things conditionally.Looping Statement
The below satement in Razor view engine is used for rendering the prouct list.<ul>
@foreach (var item in Products)
{
<li>@item</li>
}
</ul>
Razor view engine is smart enough to identify the <li> tag as an html tag and the @item as a server side value. The <li> will be rendered multiple times with the list of products. Below satatemet is used for ASPX view engine to output the same as above.
<ul>
<%foreach (var item in Products)
{ %>
<li><%=item%></li>
<%} %>
</ul>
Calling Server Side Method
To demonstrate this I have created a static method namedServerSideCode in a class and called inside a <p> tag using the appropriate view engines syntax. <p>@{RazorASPXViewEngine.Models.SampleUtility.ServerSideCode();}</p>
This code will be rendering with the output returned from the ServerSideCode()<p><%=RazorASPXViewEngine.Models.SampleUtility.ServerSideCode();%></p>
Creating a Delegate
Razor delegates are nothing but they are templates build by C# and HTML. Check more details from Phil Haack article on Templated Razor Delegates.As I'm aware of the type. I have used
Func<string[], object> instead of using Func<dynamic, object>item' to get the value inside the Func<>.@{
Func<string[], object> ProductListing =
@<ul>
@foreach (string p in item)
{
<li>@p</li>
}
</ul>;
}
Product listing from delegate-
@ProductListing(Products);
Creating a method
The@functions block in Razor helps you to define utility functions directly in the view. @functions{
public string myName()
{
return "Shemeer";
}
}
Name:@myName();
This functions should be created only when the
function is specific to the view and can't be done using other
conditional statement. By using @function we can separate view specific
logic from controller.Escape Character
Razor language parser is very smart to konw the@ symbol is used for a static content or dynamic content. Let's examine the below code lines.@@@CodeIn
@@CodeIn
shemeerns@facebook.com
The fist line will print @C# where as the second line will print @@CodeIn. The third one will be parsed intelligently by the parser and will print the email address shemeerns@facebook.com. The second line printed @@CodeIn because of the escape symbol the variable will not be considered/evaluated.To escape an
@ symbol just add @@ and it will render a single @ symbol.Comparison
Below, I have listed some of the comparisons with ASPX and Razor view engines.- Razor uses
@symbol whereas ASPX uses<% %>. - Razor view engine is launched with MVC3 and it's the defualt view engine from MVC3 where as ASPX view engine was there from the initial version and ASPX is default view engine for MVC 1 and MVC 2.
- File extensions are different for Razor (C#-cshtml, VB-vbhtml) and ASPX(aspx, ascx, master)
- For acheiving similiar functionality Razor requires very less number of keystrokes compared to ASPX.
- Razor sytax is very clean and easy to learn than ASPX view engine.
- Razor very much supports TDD (Test Driven Devolopment).
- Namespace for Razor is System.Web.Razor and for ASPX it's System.Web.Mvc.WebFromViewEngine
- Razor view engine is little slower than ASPX view engine.
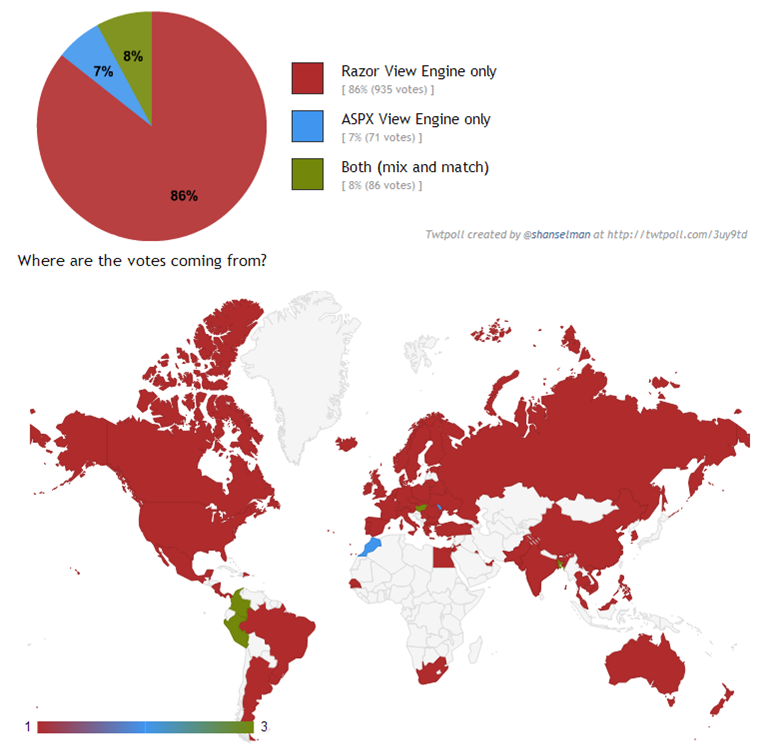
Conclusion
So what's your preference, Razor or ASPX or any other view engines?I would go for Razor beacuase of the lightweight syntax, readability, maintanability, TDD, and more.
The below given picture is taken from an online poll where they were asking the user choices of view engine,
Using attached Code
I have attached an MVC4 sample application with all the above samples. The ASPX view looks like below,<%@ Page Language="C#" Inherits="System.Web.Mvc.ViewPage" %>
<!DOCTYPE html>
<html>
<head runat="server">
<meta name="viewport" content="width=device-width" />
<title></title>
</head>
<body>
<div>
Select View Engine : <%=(Html.ActionLink("Razor", "RazorIndex", "Home")) %> | <%=(Html.ActionLink("ASPX", "ASPXIndex", "Home")) %>
<br />
<%
string ViewEngine = "ASPX";
string CodeIn = "C#";
string SpanClass = "boldclass";
bool isMale = true;
string[] Products = new string[] { "Computer", "Mobile", "Watch", "Television" };
%>
<br />
<span class="<%:SpanClass%> fontClass blueClass"><%= ViewEngine %></span>
<br />
<input type="checkbox" checked="<%: isMale%>" />
<br />
<span>Sex:<%: isMale ? "M" : "F" %></span>
<br />
<% if (isMale)
{ %>
<p>Sex:Male</p>
<% }
else
{ %>
<p>Sex:Female</p>
<% } %>
<br />
<% if (isMale)
{ %>
Sex:Male
<% }
else
{ %>
Sex:Female
<% } %>
<br />
I write code in <%:ViewEngine%> (<%:CodeIn %>)
<br />
<ul>
<%foreach (var item in Products)
{ %>
<li><%=item%></li>
<%} %>
</ul>
<br />
<p><%=(RazorASPXViewEngine.Models.SampleUtility.ServerSideCode())%></p>
</div>
</body>
</html>
The output for the above page is

Select View Engine : @Html.ActionLink("Razor", "RazorIndex", "Home") | @Html.ActionLink("ASPX", "ASPXIndex", "Home")
<br />
@*Declaration and Initialization of Server Side Variables*@
@{
    string ViewEngine = "Razor";
    string CodeIn = "C#";
    string SpanClass = "boldclass";
    bool isMale = true;
    string[] Products = new string[] { "Computer", "Mobile", "Watch", "Television" };
}
@*Definition of myName function*@
@functions{
public string myName()
{
return "Shemeer";
}
}
Name:@myName();
<br />
<span class=" @SpanClass fontClass blueClass">@ViewEngine</span>
<br />
<input type="checkbox" checked="@isMale" />
<br />
<span>Sex:@(isMale ? "M" : "F")</span>
<br />
@if (isMale)
{
<p>Sex:Male</p>
}
else
{
<p>Sex:Female</p>
}
<br />
@if (isMale)
{
<text>Sex: Male</text>
}
else
{
<text>Sex:Female</text>
}
<br />
@if (isMale)
{
    @:Sex:Male
}
else
{
    @:Sex:Female
}
<br />
I write code in @ViewEngine (@CodeIn)
<br />
<ul>
    @foreach (var item in Products)
    {
        <li>@item</li>
    }
</ul>
<br />
@@@CodeIn
@@CodeIn
shemeerns@facebook.com
<br />
<p>@(RazorASPXViewEngine.Models.SampleUtility.ServerSideCode())</p>
The output for the above page is given below

You can download the application and try yourself.
Note: All the codes are just to demonstrate the functionality.
References
- Poll Image - http://twtpoll.com/3uy9td
- haacked- Razor Syntax Quick Reference
- Scottgu- Introducing Razor
No comments:
Post a Comment