What is silverlight ?
This gives an introduction to the new Microsoft Silverlight technology.
Silverlight is a web based technology, launched by Microsoft in April 2007. Silverlight is considered as a competitor to Adobes Flash.
Silverlight applications are delivered to browsers in a text-based markup language called XAML. One important difference between Flash and XAML is, Flash is a compiled application where as XAML is text based. Search engines can analyze and index such content, which is a huge benefit for webmasters.
For regular internet users, Silverlight is a browser plug-in that supports video, audio and animations.
For web developers, Silverlight offers much more. Silverlight supports video and audio files without need of much programming. It allows them to handle events from web pages (like handle start/end of video playing etc)
Difference between Silverlight 1 and Silverlight 2
This chapter explains some of the primary differences between Silverlight 1 and Silverlight 2
Silverlight 1 is purely AJAX and Javascript based. All the code has to be written in Javascript and XAML.
Silverlight 2 supports managed code. When Silverlight 2 runtime is installed, it installs a limited version of .NET runtime on the client machine. This allows .NET programmers to write managed code to be executed on the client PC and provide a better user experience to the users. Of course, there is security and restrictions built in to it so that the code has limited access to the client computer.
Developers must be aware that if the end user decline to install the .NET runtime on their client computer, the Silverlight 2 applications will not run.
Difference between Silverlight and WPF
This chapter explains some core differences between Silverlight and WPF (Windows Presentation Foundation)
Silverlight and Windows Presentation Foundation (WPF) are 2 different products from Microsoft, but has lot of overlap. Silverlight is a sub set of WPF in terms of features and functionality.
Silverlight is a Microsoft technology, competing with Adobes Flash and is meant for developing rich browser based internet applications.
WPF is a Microsoft technology meant for developing enhanced graphics applications for desktop platform. In addition, WPF applications can be hosted on web browsers which offers rich graphics features for web applications. Web Browser Appliactions (WBA) developed on WPF technology uses XAML to host user interface for browser applications. XAML stands for eXtended Application Markup Language which is a new declarative programming model from Microsoft. XAML files are hosted as descrete files in the Web server, but are downloaded to the browsers and converted to user interface by the .NET runtime in the client browsers.
WPF runs on .NET runtime and developers can take advantage of the rich .NET Framework and WPF libraries to build really cool windows applications. WPF supports 3-D graphics, complex animations, hardware acceleration etc.
Tools required to develop Silverlight applicationsThis chapter talks about various development tools available to develop Silverlight applications. |
|||||||
| To run Silverlight applcations in a web browser, you need to
have Silverlight run time installed on the client browser as a plug in.
This is a light weight version of .NET runtime. However, to develop a Silverlight application, you need something more. Silverlight SDK This include a set of tools required to compile and build Silverlight controls. If you are comfortable writing HTML using notepad and compiling .NET applications from console tools, then you just need the Silverlight SDK to develop Silverlight applications. However, most people use some kind of IDE to develop applications faster. Microsoft offers 2 separate tools to develop Silverlight applications: 1. Microsoft Expression Studio - this tool is meant for web designers to create rich visual elements for Silverlight applications. Expression Studio is recommended for web designers who create rich internet applications with enhanced visual content and graphics. There are several features provided for creating enhanced graphics elements with lot of options to pick color, font etc. 2. Microsoft Visual Studio - this is the integrated development environment from Microsoft to develop .NET applications. Programmers can use Visual Studio to develop Silverlight applications which require programming. Visual Studio allows programmers to develop sophisticated Silverlight applications in any .NET language (like C#, VB.NET etc). If you are using Visual Studio, you can download the Silverlight development tools from here. This download include the Service pack1 for VS.NET and the Silverlight SDK. Which tool to use - Expression Studio or Visual Studio ? If your Silverlight application include just graphics adn visual elements, then you can use Expression Studio. However, if you are a programmer and if your Silverlight application include programming logic, then you might want to choose Visual Studio. | |||||||
| |||||||
What is XAML ?
This chapter gives an introduction to XAML - the eXtended Application Markup Language
XAML stands for eXtended Application Markup Language. XAML contain XML that is used to declaratively specify the user interface for Silverlight or WPF applications.
For example, if you need to display a rectangle, this is the XAML you need to use:
    <Canvas Width="500" Height="500" Background="White">
        <Rectangle Canvas.Left="75" Canvas.Top="90" Fill="red" Width="100" Height="100" />
    </Canvas>
When the above xaml is executed, it will display a rectangle filled with red color.
You may notice is that XAML is very similar to HTML in nature.
What is .xap file ?
This chapter explains the purpose of .xap file in Silverlight applications
.xap file is the compressed output file for the Silverlight application. The .xap file includes AppManifest.xaml, compiled output assembly of the Silverlight project (.dll) and any other resource files referred by the Silverlight application.
Web pages like .aspx files and .html files use the Silverlight components by loading the .xap files using the <object> tag in the HTML or by using <asp:Silverlight> tag in the ASP.NET pages.
".xap" files (pronounced "zap") use the standard .zip compression algorithm to minimize client download size. A "hello world" .NET Silverlight application (built using VB or C#) is about 5KB in size.
Let us see how a .xap file look like.
Open Visual Studio and create a new project by selecting "Silverlight Application" under the project type "Silverlight". Choose the project name "SilverlightTest". In the next screen, choose the option "automatically generate a test page to host Silverlight at build time".
Visual Studio creates a project with 2 files:
1. App.xaml
2. Page.xaml
Compile and run the application by pressing Ctrl + F5. You can see the browser opening with an empty page (the page is empty because you have nothing in your default xaml file).
Now open your windows explorer and look in to the bin\debug folder of your project. You can see a file called "SilverlightTest.xap".
Rename this file to SilverlightTest.zip and open it using any decompression tool. You can see that this is just like any other zip file and it includes the projects output dll and another file called "AppManifest.xaml".
"Hello World" Silverlight application
In this chapter, you will learn how to create your first Silverlight application
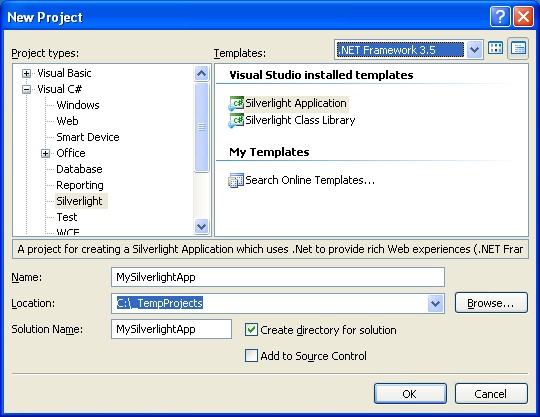
Open Visual Studio and select the menu "File" > "New" > "Project"
Select the Project Type as "Silverlight" under your favorite language and choose the template "Silverlight Application". I have selected Visual C# as the tutorials here.
I have named my project as "MySilverlightApp" and have selected the option "Create directory for solution" so that all my project files are organized within a folder structure.
We need a web page to host the Silverlight components that we develop. Visual Studio makes this job easier in the next step by prompting you to automatically create a website. Choose the options as shown in the attachment.
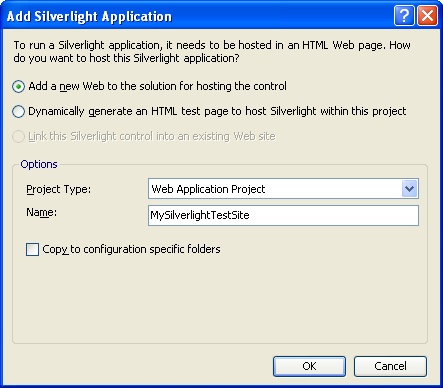
You are ready to rock ! Just press OK and Visual Studio will create 2 projects and a bunch of files for you. We will analyze some of the files created by Visual Studio in the next chapter.
Files created by Visual Studio by default
In this chapter, let us analyze some of the files created by default by Visual studio
When we create a new Silverlight application using Visual Studio 2008, it creates several files by default. See the solution explorer immediately after creating a new Silverlight project with a host website:
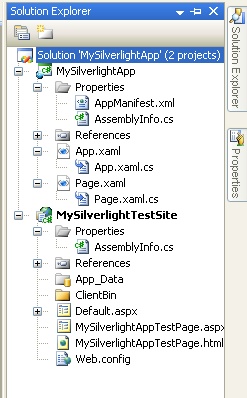
We will analyse some of the files.
AppManifest.xml
This file defines the assemblies that are deployed to the client applications.
Build and run your Silverlight hello World application
In this chapter, you will learn how to build and run your Silverlight application
It is time to build and run your first Silverlight application. Press Ctrl+F5 to build and run your application. If everything is setup correctly, then Internet Explorer will be launched automatically with your default page which hosts your Silverlight object.
Since you have not done much for your control, you will see a blank page opened in the browser.
Go back to your Visual Studio and open your web page which hosts the Silverlight object. In my sample project, the file is named "MySilverlightAppTestPage.aspx" and the content of the file looks like this:
<%@ Page Language="C#" AutoEventWireup="true" %>
<%@ Register Assembly="System.Web.Silverlight"
  Namespace="System.Web.UI.SilverlightControls" TagPrefix="asp" %>
<!DOCTYPE html PUBLIC "-//W3C//DTD XHTML 1.0 Transitional//EN"
  "http://www.w3.org/TR/xhtml1/DTD/xhtml1-transitional.dtd">
<html xmlns="http://www.w3.org/1999/xhtml" style="height:100%;">
<head runat="server">
<title>Test Page For MySilverlightApp</title>
</head>
<body style="height:100%;margin:0;">
<form id="form1" runat="server" style="height:100%;">
<asp:ScriptManager ID="ScriptManager1" runat="server"></asp:ScriptManager>
<div style="height:100%;">
<asp:Silverlight ID="Xaml1" runat="server" Source="~/ClientBin/MySilverlightApp.xap"
  MinimumVersion="2.0.30523" Width="100%" Height="100%" />
</div>
</form>
</body>
</html>
Most of the stuff above look familiar to ASP.NET developers. Some of the lines that need some attention are:
<asp:ScriptManager ID="ScriptManager1" runat="server"></asp:ScriptManager>
<asp:Silverlight ID="Xaml1" runat="server" Source="~/ClientBin/MySilverlightApp.xap"
 MinimumVersion="2.0.30523" Width="100%" Height="100%" />
The second line defines the Silverlight control to be hosted in the web page. The attribute "Source" defines the .xap file to be used by the web page. This .xap file contains the XAML and code from your .xaml files and will be executed by the Silverlight plugin.
In the current sample, you have just one xaml file called Page.xaml. When you compile the solution, this file is compiled into a special file (MySilverlightApp.xap) with the extension .xap.
What is app.xaml ?
This chapter explains the significance of app.xaml file in a Silverlight application.
App.xaml is a file used by Silverlight applications to declare shared resources like brushes, various style objects etc. Also, the code behind file of app.xaml is used to handle global application level events like Application_Startup, Application_Exit and Application_UnhandledException. (Similar to Global.asax file for ASP.NET applications)
When Visual Studio creates the app.xaml file automatically, it creates few event handlers with some default code. You can change the code appropriately.
private void Application_Startup(object sender, StartupEventArgs e)
{
}

private void Application_Exit(object sender, EventArgs e)
{
}

private void Application_UnhandledException(object sender, ApplicationUnhandledExceptionEventArgs e)
{
}
For ASP.NET developers, the above code will look familiar. This is similar to the aplication level event handlers in Global.asax.
Page.xaml file
This chapter gives an introduction to the Page.xaml file automatically created by Visual Studio while creating a Silverlight project.
When you create a Silverlight project using Visual Studio 2008, it creates a default xaml file called "Page.xaml". This is just a dummy start page created by Visual Studio and it does not contain any visible UI elements. The default content of the page.xaml file looks like this:
<UserControl x:Class="MySilverlightApp.Page"
xmlns="http://schemas.microsoft.com/winfx/2006/xaml/presentation"
xmlns:x="http://schemas.microsoft.com/winfx/2006/xaml"
Width="400" Height="300">
  <Grid x:Name="LayoutRoot" Background="White">


  </Grid>
</UserControl>
The above code shows a user control and a Grid control. The UserControl is a high level control that holds all other UI elements in a xaml file.
The Grid control is used as a layout panel and it can hold other UI elements. All UI elements in a .xaml control must be placed within a layout panel. There 3 different types of layout panels available in Silverlight 2.0. You will learn more about layout controls in a later chapter.
When you compile your Silverlight Application project, it will compile all .xaml files and various other resources in to a single assembly file. This assembly file will have the extension .xap and will have the same file name as your project name.
To place your Silverlight control in a web page, you must refer to this .xap file in your web page. When the .xap file is referred in a web page, the default .xaml page will be shown. Based on user actions, you may open or close various .xaml files included in your .xap assembly (Silverlight Application project).
Getting started with XAML tags
This chapter gives an introduction to the XAML tags in Silverlight applications.
Let us add a xaml tag to your Page.xaml file and see how it works.
Open page.xaml file from your Visual Studio project and place the following code within the Grid element:
<Rectangle Fill="Blue" Width="100" Height="100"/>
Now compile and run the application. You can see a blue rectangle displayed in your web page.
As demonstrated above, the elements in a Silverlight xaml page are declared using XAML tags. Silverlight 2 offers several XAML tags including common form tags like textbox, button etc and various other UI elements like rectangle.
One nice thing about Visual studio is, it will show you a preview of the page as you type the xaml tags. When you complete typing the above xaml tags in your .xaml page, you will see the design preview in Visual Studio as shown below:
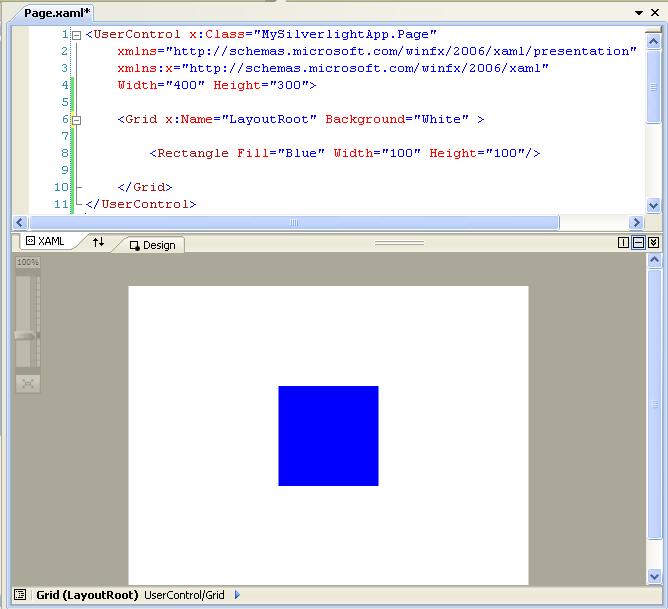
You can swap the position of the code and preview by pressing the icon with 2 arrows in the middle of the screen (between the tabs "XAML" and "Design". Also, you can use the icons on the right end between the code and design panes to change the position of the code pane and design preview.
How to place a Silverlight control in a web page ?
This chapter explains how to place silverlight controls in a web page.
Each Silverlight Application project can have multiple .xaml pages. When you create a new Silverlight Application project, Visual Studio creates a default .xaml file called Page1.xaml. To add more .xaml pages, right click on the project in the Solution Explorer and select "Add" and "New Item". Then select "Silverlight User Control"
One or more Silverlight Applications can be placed in a web page using xaml tags as shown below:
<asp:Silverlight ID="Xaml1" runat="server"
         Source="~/ClientBin/MySilverlightApp.xap"
         Width="300" Height="300" />
In the above tag, the attribute "source" represents the name of the xap file which is the compiled output of the Silverlight project. The .xap files contains the compiled version of all .xaml files included in the Silverlight Application project.
When you compile the Silverlight Application project, it will be compiled to an assembly with the extension .xap. For example, if your Silverlight project name is "MySilverlightControl", when compiled, it will produce the assembly MySilverlightControl.xap
Each Silverlight project can have multiple .xaml files. Each .xaml file is like a page or form by itself. When you place a Silverlight Application in a web page, only one .xaml control will be visible at a time. Based on various user actions, you may dynamically open various .xaml pages (Just like you open forms in a windows application).
How to set default .xaml page in a Silverlight control ?
This chapter demonstrates how to change the default .xaml page used in a Silverlight control
Each Silverlight project can have multiple .xaml files. However, only one .xaml file will be visible at a time.
When you create a Silverlight project in Visual Studio, it will create a .xaml file called "Page1.xaml" by default and this .xaml control will be displayed by default when you open the web page.
You can change the default .xaml page by setting the property "Application.RootVisual".
To try this, add a .xaml file called "Page2.xaml" in your silverlight project.
Now, open your App.xaml.cs file in the Silverlight project. Look at the Application_Startup event handler. There you can see the default .xaml page being set. To change the default .xaml page, you have to specify the name of the class used in the .xaml page and set it to the Application.RootVisual property as shown below:
private void Application_Startup(object sender, StartupEventArgs e)
{
     this.RootVisual = new Page2();
}
After you change the value here, compile the application and run. When the web page is opened, you can see that the new .xaml control is displayed in the web page.
How to open XAML pages from another XAML page ?
This chapter shows how to open a xaml page from another xaml page.
In a Silverlight application, you can have multiple XAML pages. When you use the .xap file in the web page, only one XAML control will be displayed at a time. The default XAML file displayed is determined by the following code in the App.xaml file:
this.RootVisual = new Page1();You can change the above line to the class name of any oher xaml file to open that file by default.
Another scenario is, you may want to open different xaml files from the default xaml page. For example, consider that you have a xaml control that prompt user to enter login information. After the login credentials are validated, you may want to redirect to another xaml file when the user click the "Submit" button.
This can be done by setting the "Content" property of the xaml page.
private void SubmitButton_Click(object sender, RoutedEventArgs e)
{
        this.Content = new NewXamlPage();
}
The above code shows how to set the "Content" property of the xaml control in the button click event handler. When the user click on the submit button, the new xaml file (NewXamlpage) will be opened and original xaml file will be recycled.
Open a specific xaml page from a Silverlight control
This chapter shows how to open a specific xaml file from a Silverlight control which include multiple xaml pages.
Each Silverlight application project may include multiple xaml pages. When you refer to a .xap file from a web page, the xaml page set using the Application.RootVisual property will be displayed by default.
There may be cases where you want different XAML files to be displayed when you refer to the same .xap file from different web pages. You can do this by passing the xaml file name or some other kind of identification using InitParameters property of the Silverlight control. This property can be set to the Silverlight control from the web page. The value set from web page will be read by the Silverlight control and appropriate xaml page will be opened.
To demonstrate this, let us create a sample Silverlight project with the name "OpenSpecificXaml". (You can read the steps to create a new Silverlight project.)
After you compile and build your project, place the Silverlight control in your web page as shown below:
<asp:Silverlight
    InitParameters="PageName=Page1"
    ID="Xaml1"
    runat="server"
    Source="~/ClientBin/OpenSpecificXaml.xap"
    MinimumVersion="2.0.30923.0"
    Width="100%" Height="100%" />
In the above code, see the code:
InitParameters="PageName=Page1"
Here we are setting the property "InitParameters" with a key-value pair indicating which xaml page we want to open by default.
Now, we will read this property in the App.xaml file and set the appropriate page to the Application.RootVisual property. Here is the sample code to use in the App.xaml.cs to achieve this:
private void Application_Startup(object sender, StartupEventArgs e)
{
    IDictionary parameters = e.InitParams;

    if (parameters == null)
    {
        // No parameter passed.. open the default xaml
        this.RootVisual = new DefaultPage();
    }
    else if (parameters["PageName"] == "Page1")
    {
        this.RootVisual = new Page1();
    }
    else if (parameters["PageName"] == "Page2")
    {
        this.RootVisual = new Page2();
    }
    else
    {
        // Open the default xaml
        this.RootVisual = new DefaultPage();
    }
}
No comments:
Post a Comment